How to use Nametag for sign in with ID
Welcome
This tutorial will walk you through using Nametag to identify users to your web site using their ID. We don’t expect any prior experience with Nametag, OIDC, or any particular Node.js libraries. However, we will be using Node.js and Javascript to serve our very simple web site, so having Node installed on your computer is required; some experience with that will be useful.
There are two parts to setting up this example
- Creating a Nametag organization and configuring it for your application.
- Creating the application and configuring it to use Nametag.
Configuring Nametag
To get started, go to https://console.nametag.co. Because we use our own sign in with ID to control access to the developer console, you will first need to scan the QR code and provide your ID to access the site.
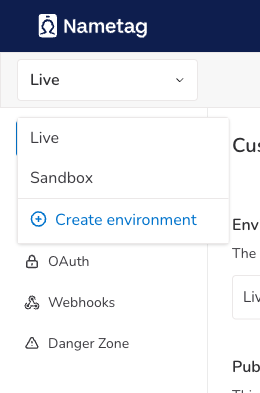
Since we are testing, switch to the Sandbox environment.
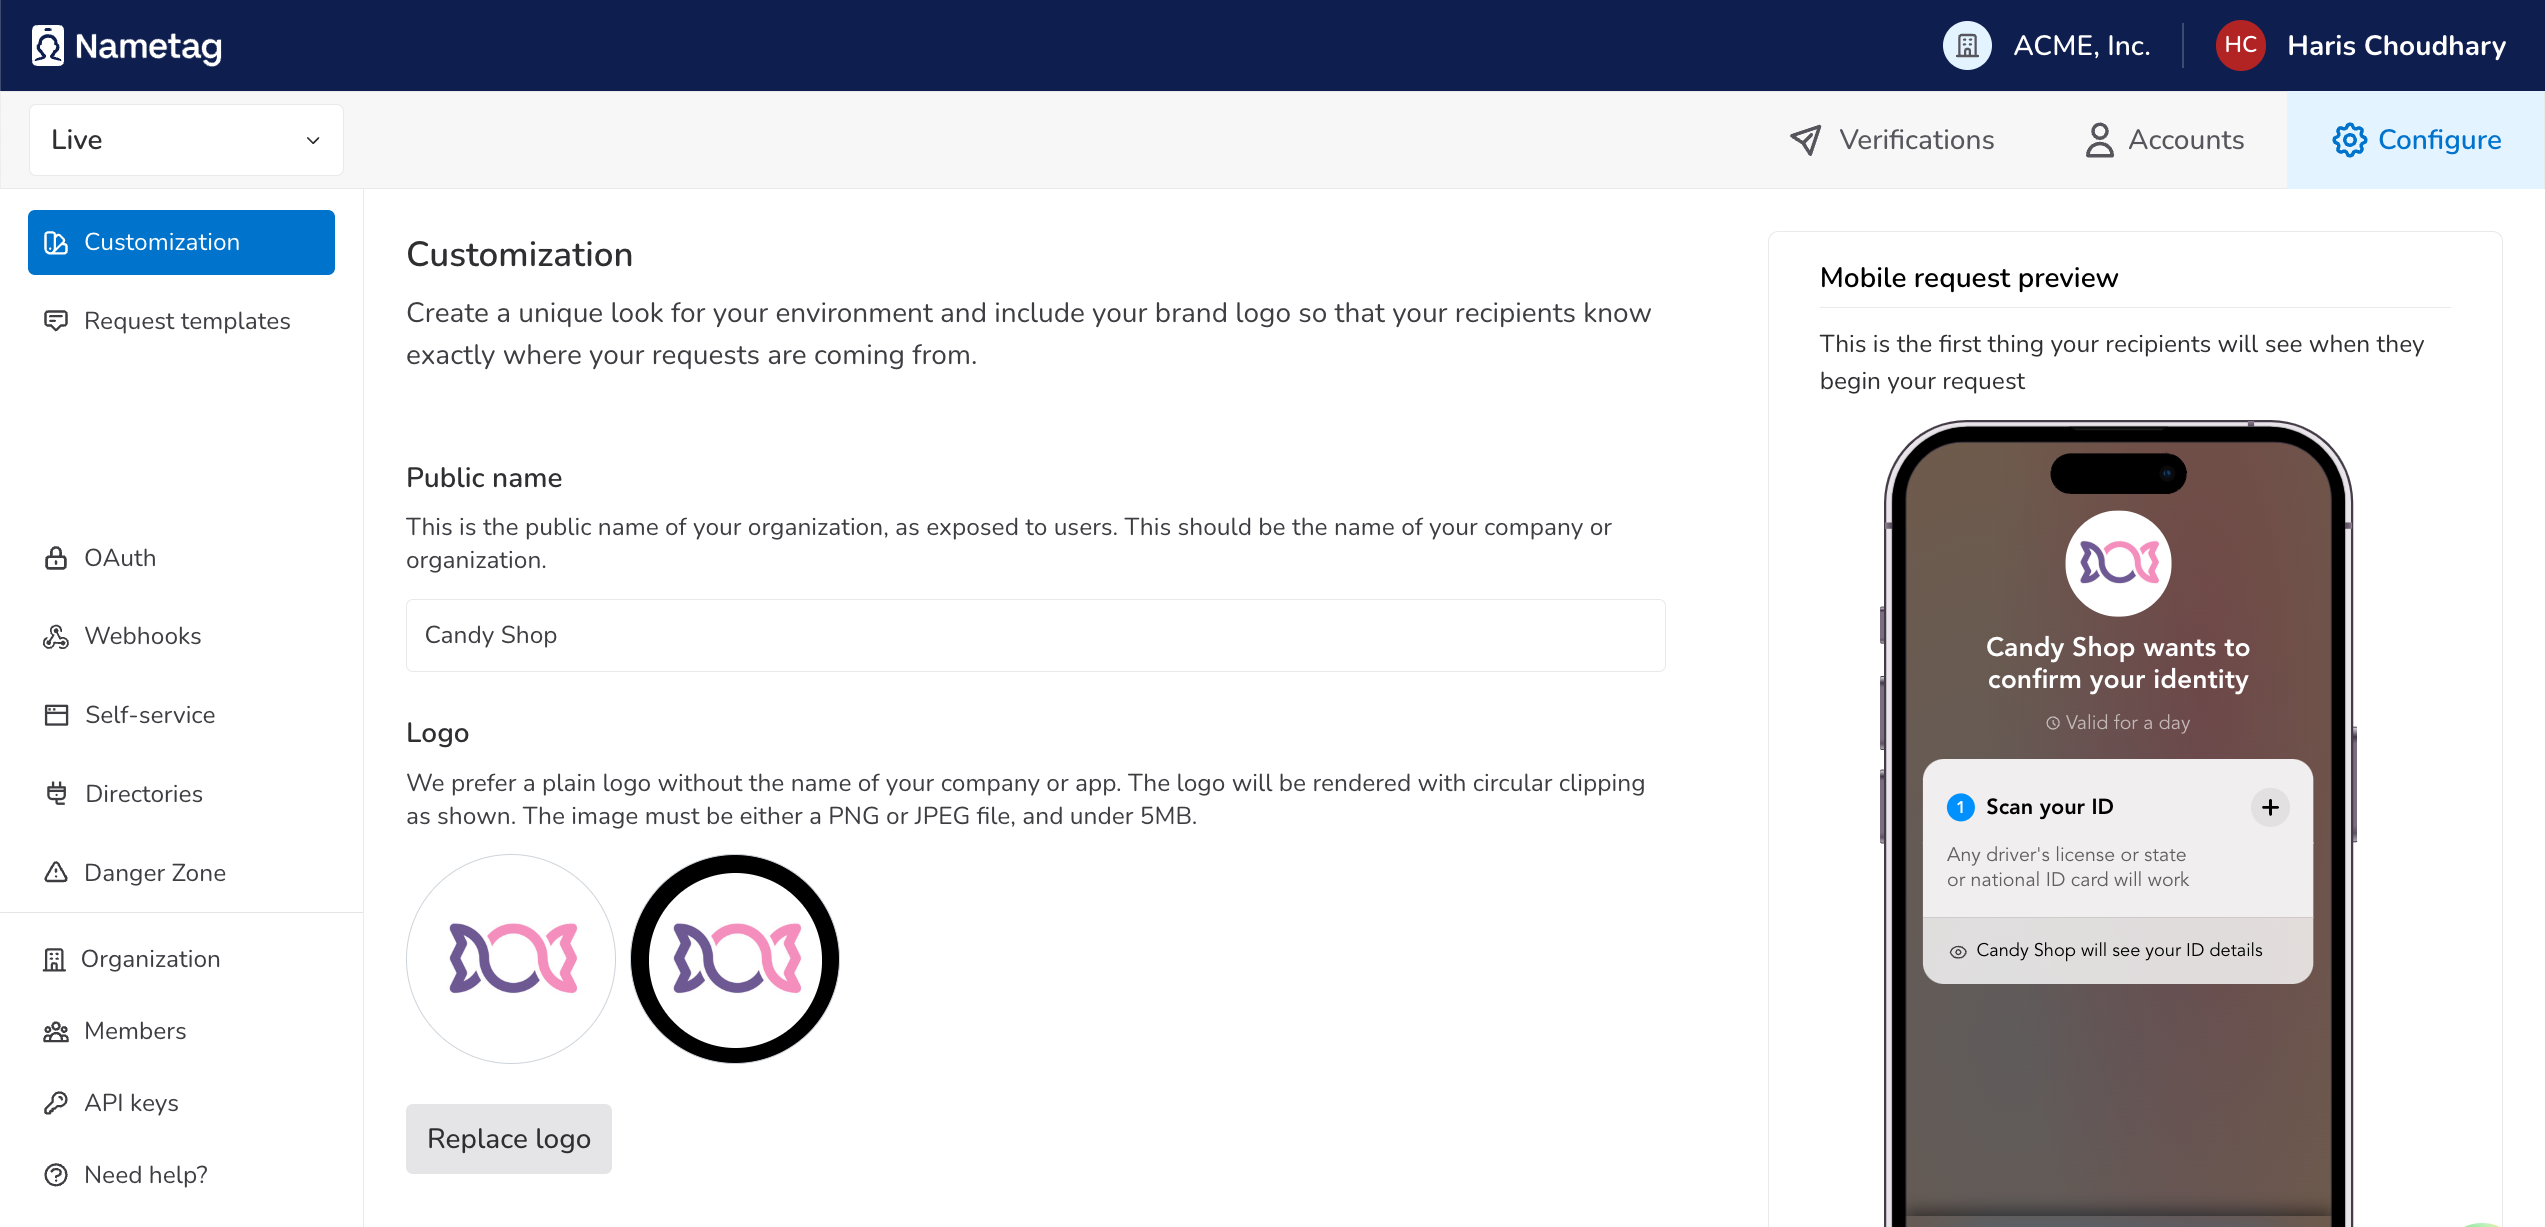
On the App Customization page, edit the public name and icon for your app.
-
Set the public name to “Candy Shop”
-
Set the description to “The world’s best candy store”
-
Download the sample logo for the Candy Shop application and use it as the logo.
When the App Customization page is complete, it should look something like this:
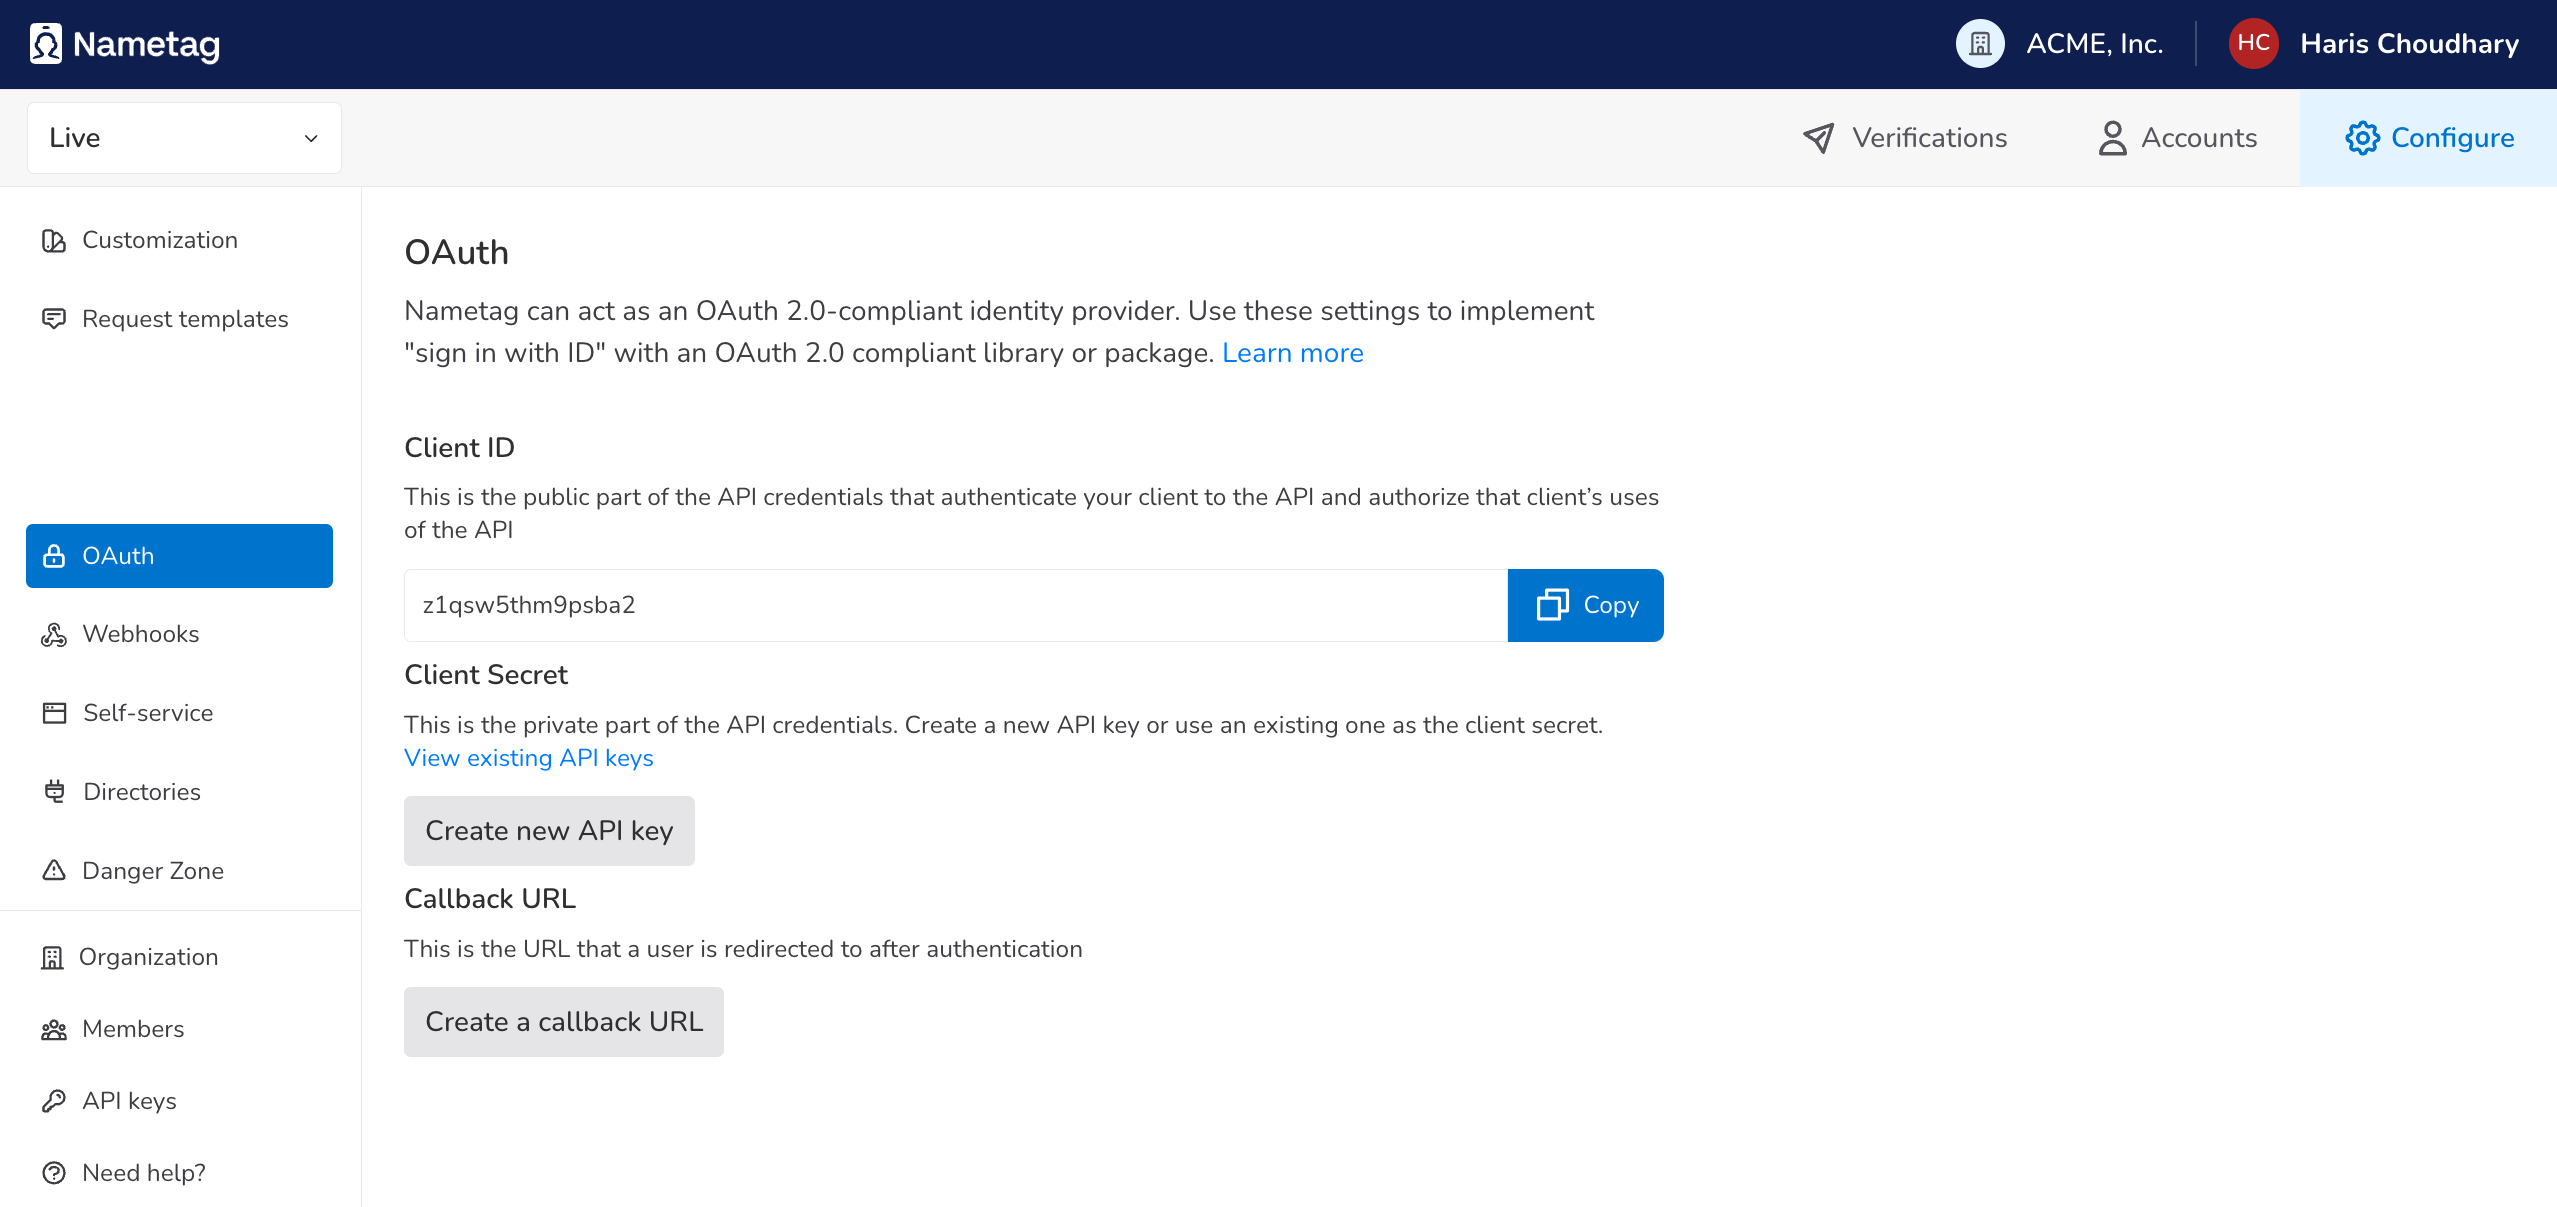
Nametag uses Open ID Connect (OIDC) for sign in, which is an extension build on top of the OAuth 2.0 protocol. We need to configure an OAuth 2.0 Client ID and Secret which we’ll use later. On the OAuth tab:
- Make a note of your Client ID.
- Press Create a new API key, and make a note of your API Key. (Note: you’ll only be able to access this API key once, if you lose it, you’ll have to generate a new one.)
- Press Create a callback URL and enter “http://localhost:9000/callback”
Creating an application
Now that we’ve configured Nametag for our application and have our client ID and secret, we can start implementing a web site that uses Nametag to allow people to log in. We won’t use any fancy frameworks or anything, just standard node libraries.
Check that you have node installed:
$ node -p true
true
Create a file called tutorial.js with the following content, for a very basic web server:
const http = require("http");
const host = 'localhost';
const port = 9000;

const requestListener = function (req, res) {
    res.writeHead(200);
    res.end("Hello, World!");
};

const server = http.createServer(requestListener);
server.listen(port, host, () => {
    console.log(`listening on http://${host}:${port}`);
});
Run the server with:
$ node tutorial.js
listening on http://localhost:9000
Open your browser to http://localhost:9000 and you should see our greeting.
Crafting an authorization request
Nametag uses OIDC to negotiate credentials between the end-user, Nametag, and your web application. The OIDC exchange is shown in the diagram in Nametag Authentication Flow Sequence Diagram.
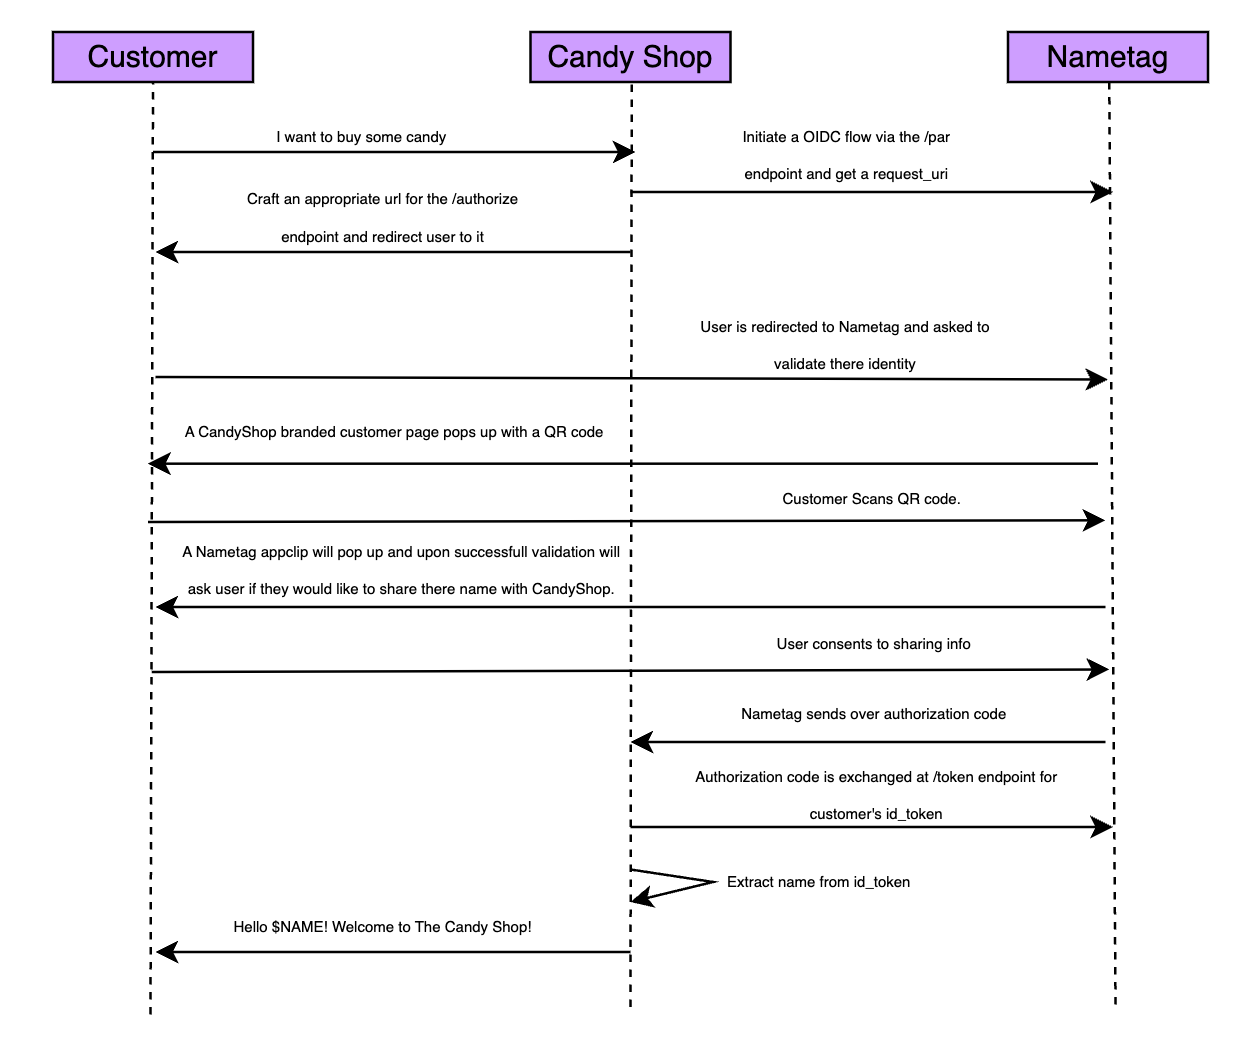
Our simple web application needs to implement those steps. To start, we need to create an authorization request and direct our users there using the result.
const client_id = "CLIENT-ID"
const client_secret = "CLIENT-SECRET"
var request_uri

// Define the ClaimsRequestParameter object
class ClaimsRequestParameter {
    constructor() {
        this.id_token = {};
    }

    // Method to add a claim request to the id_token map
    addClaim(key, claimRequest) {
        this.id_token[key] = claimRequest;
    }
}

// requestListener is the main request handler
async function requestListener(req, res) {
    // craft a request for the /par endpoint that requests the `openid` scope and `name` claim
    // We encode the current URL as `state` so that we know where to redirect, but you
    // can use whatever you like there.
    const claimsRequestParam = new ClaimsRequestParameter();
    claimsRequestParam.addClaim("name", null);
    const jsonString = JSON.stringify(claimsRequestParam);

    const body = new URLSearchParams();
    body.append("client_id", client_id);
    body.append("client_secret", client_secret);
    body.append("redirect_uri", "http://localhost:9000/callback");
    body.append("state", req.url);
    body.append("scope", "openid");
    body.append("claims", jsonString);

    try {
        const response = await fetch("https://nametag.co/oauth2/par", {
            method: "POST",
            body: body,
            headers: { "Content-Type": "application/x-www-form-urlencoded" },
        });

        // Parse the JSON response
        const result = await response.json();
        request_uri = result.request_uri;

        // Write the result back to the client
        res.writeHead(200, { "Content-type": "application/json" });
        res.write(JSON.stringify(result));
        res.end();
    } catch (error) {
        // Handle errors during the request
        console.error("Error during request:", error);
        res.writeHead(500, { "Content-type": "application/json" });
        res.write(JSON.stringify({ error: "Internal server error" }));
        res.end();
    }
}
Kill and restart your server process. Then direct your browser to http://localhost:9000 and click “Log in”.
You should see the result of your request to the /oauth2/par endpoint. Note at this point, we have registered the request with Nametag and got back a request_uri. We will use this to redirect the user to start the authorization flow.
Using our request_uri we obtained from Nametag, we need to craft an authorization request URL and direct our users there.
We will make adjustments to requestListener() to do so.
// requestListener is the main request handler
async function requestListener(req, res) {
    // craft a request for the /par endpoint that requests the `openid` scope and `name` claim
    // We encode the current URL as `state` so that we know where to redirect, but you
    // can use whatever you like there.
    const claimsRequestParam = new ClaimsRequestParameter();
    claimsRequestParam.addClaim("name", null);
    const jsonString = JSON.stringify(claimsRequestParam);

    const body = new URLSearchParams();
    body.append("client_id", client_id);
    body.append("client_secret", client_secret);
    body.append("redirect_uri", "http://localhost:9000/callback");
    body.append("state", req.url);
    body.append("scope", "openid");
    body.append("claims", jsonString);

    try {
        const response = await fetch("https://nametag.co/oauth2/par", {
            method: "POST",
            body: body,
            headers: { "Content-Type": "application/x-www-form-urlencoded" },
        });

        if (response.status === 200) {
            const result = await response.json();
            const request_uri = result.request_uri;

            const query = new URLSearchParams();
            query.set("request_uri", request_uri);

            const authorize_url = `https://nametag.co/oauth2/authorize?` + query.toString();

            res.writeHead(200, { "Content-type": "text/html" });
            res.write(`<html><a href="${authorize_url}">Log in</a></html>`);
            res.end();
        } else {
            const errorText = await response.text(); // Capture the response body for non-200 statuses

            res.writeHead(response.status, { "Content-type": "application/json" });
            res.write(
                JSON.stringify({
                    error: "Request to /par endpoint failed",
                    status: response.status,
                    response: errorText,
                })
            );
            res.end();
        }
    } catch (error) {
        // Handle errors during the request
        console.error("Error during request:", error);
        res.writeHead(500, { "Content-type": "application/json" });
        res.write(
            JSON.stringify({
                error: "Internal server error",
                details: error.message,
            })
        );
        res.end();
    }
}
Kill and restart your server process. Then direct your browser to http://localhost:9000 and click “Log in”. You will be directed to Nametag and prompted to scan a QR code.
Note that the Candy Shop logo and the text on the upper right that says “Back to Candy Shop”. This means we’ve done the branding correctly.
Handling the OAuth 2.0 callback
If you click “Log in” and complete the process, you’ll end up right back where you started, with the “Log in” link. But notice that this time the URL contains a bunch of query parameters. It might look something like this:
http://localhost:9000/callback?code=1c20d6c1dc05190b8b45db47e13442e1&state=%2F
This is our callback URL, and we must handle those query parameters.
First we will add some simple http routing to our server:
// requestListener is the main request handler
async function requestListener(req, res) {
    // Very simple request routing. In real life, you'd use something
    // from a framework or library.
    const url = new URL(req.url, `http://${req.headers.host}`)
    if (url.pathname == "/callback") {
        return handleCallback(url, req, res)
    }

    // ... the rest of our requestListener function
}
In handleCallback() we will execute an HTTP request against the token endpoint to trade
our code for an id_token
async function handleCallback(url, req, res) {
    const code = url.searchParams.get("code")

    // make a request to the token endpoint to exchange the code for an
    // id_token and other information about the person.
    let requestBody = new FormData()
    requestBody.append("grant_type", "authorization_code")
    requestBody.append("client_id", client_id)
    requestBody.append("client_secret", client_secret)
    requestBody.append("redirect_uri", "http://localhost:9000/callback")
    requestBody.append("code", code)
    let tokenResponse = await fetch("https://nametag.co/oauth2/token", {
        method: "POST",
        body: requestBody
    })
    let tokenResponseBody = await tokenResponse.json()
    res.writeHead(200, { "Content-Type": "text/html" });
    res.write(`<html><body><h1>Token Response</h1><pre>${JSON.stringify(tokenResponseBody, null, 2)}</pre></body></html>`);
    res.end();
}
Restart the server and run through the login flow again, you will get output that looks something like:
{
  "access_token": "eyJhbGciOiJFUzI1NiIsInR5cCI6IkpXVCJ9.eyJhdWQiOiJvYXQiLCJleHAiOjE3MzkyNTMxNTUsImlhdCI6MTczOTI0OTU1NSwiaXNzIjoiaGFyaXMubmFtZXRhZ2Rldi5jb20iLCJuYmYiOjE3MzkyNDk1NTUsInN1YiI6Im5yNHN1enI3M2Y1Y3lhcGc0c252bnF2YmU0QHoxcXN3NXRobTlwc2JhMi5oYXJpcy5uYW1ldGFnZGV2LmNvbSJ9.qcd4Cah0Hz61rwmXEs_k_o-mcEersXzeQ8lcH-J1bbWtreGXrNCh35Cgobt0h7hOY7tTtpaq5u_-fdGe-TQ-1A",
  "refresh_token": "eyJhbGciOiJFUzI1NiIsInR5cCI6IkpXVCJ9.eyJhdWQiOiJvcnQiLCJleHAiOjIxNDc0ODM2NDcsImlhdCI6MTczOTI0OTU1NSwiaXNzIjoiaGFyaXMubmFtZXRhZ2Rldi5jb20iLCJuYmYiOjE3MzkyNDk1NTUsInN1YiI6Im5yNHN1enI3M2Y1Y3lhcGc0c252bnF2YmU0QHoxcXN3NXRobTlwc2JhMi5oYXJpcy5uYW1ldGFnZGV2LmNvbSJ9._2I8uYvpX8dHDYN-ZaxYF1BNLNhox7n2-W2Dj_WF0UI-INFgbTx2cIGiswiPWfbxLPqJA2jvLLYFgZGKf-sN_A",
  "id_token": "eyJhbGciOiJFUzI1NiIsInR5cCI6IkpXVCJ9.eyJhdWQiOiJvaXQiLCJleHAiOjIxNDc0ODM2NDcsImlhdCI6MTczOTI0OTU1NSwiaXNzIjoiaGFyaXMubmFtZXRhZ2Rldi5jb20iLCJuYmYiOjE3MzkyNDk1NTUsInN1YiI6Im5yNHN1enI3M2Y1Y3lhcGc0c252bnF2YmU0QHoxcXN3NXRobTlwc2JhMi5oYXJpcy5uYW1ldGFnZGV2LmNvbSIsImxlZ2FsX25hbWUiOiJIYXJpcyBDaG91ZGhhcnkifQ.Jyas-CHsWZ-cW8zTDnDg7rD6Jc_dIArWbiI08l-ukidYJc9aTt7VT5m-o5UKfu5-TM0oTcrugYl3r-Roe8do5A",
  "scope": "openid",
  "expires_in": 3600,
  "token_type": "Bearer",
  "subject": "nr4suzr73f5cyapg4snvnqvbe4@z1qsw5thm9psba2.nametag.co"
}
The two fields of interest here are id_token which is suitable for use as an end-user authentication token,
and subject, which uniquely identifies the user.
Note:
subjectis not suitable for use as end-user authentication by itself because it does not embed any kind of signing.id_tokenis basically just a signed blob that encodessubject.
The id_token returned will have all the claims we asked for during the start of the request. In this case it was name.
The token is basically a JWT Token that needs to be decoded for us to glean any useful information out of.
To decode and display the id_token, we can modify our call back function slightly. But first you will require a JS library called jsonwebtoken. You can install it from command line via:
npm install jsonwebtoken
Once installed, modify handleCallback() as shown below:
const jwt = require("jsonwebtoken");

async function handleCallback(url, req, res) {
  const code = url.searchParams.get("code")

  // make a request to the token endpoint to exchange the code for an
  // id_token and other information about the person.
  let requestBody = new FormData()
  requestBody.append("grant_type", "authorization_code")
  requestBody.append("client_id", client_id)
  requestBody.append("client_secret", client_secret)
  requestBody.append("redirect_uri", "http://localhost:9000/callback")
  requestBody.append("code", code)
  let tokenResponse = await fetch("https://nametag.co/oauth2/token", {
      method: "POST",
      body: requestBody
  })
  let tokenResponseBody = await tokenResponse.json()
  const id_token = tokenResponseBody.id_token
  const decoded = jwt.decode(id_token);
  res.writeHead(200, { "Content-Type": "text/html" });
  res.write(`<html><body><h1>id_token</h1><pre>${JSON.stringify(decoded, null, 2)}</pre></body></html>`);
  res.end();
}
Restart the server and run through the login flow again, you will get output that looks something like:
{
  "aud": "b34bxo33g6r3xv2",
  "exp": 1741843471,
  "iat": 1741839871,
  "iss": "nametag.co",
  "nbf": 1741839871,
  "sub": "y2slmdv3j4ggmlhvnsgo6k5q74@b34bxo33g6r3xv2.nametag.co",
  "name": "Haris Choudhary"
}
The decoded id_token has both the unique identifier in the form of the sub and the name of the user that authenticated during the request. Additional claims that are requested will also appear here once the process is completed.
A helpful endpoint to determine what the openid configuration looks like is the .well-known endpoint. It returns a JSON response with some useful fields such as the claims that are supported by nametag. An example of the response return is:
{
  "issuer": "https://nametag.co",
  "authorization_endpoint": "https://nametag.co/oauth2/authorize",
  "token_endpoint": "https://nametag.co/oauth2/token",
  "jwks_uri": "https://nametag.co/.well-known/jwks",
  "response_types_supported": [
    "code"
  ],
  "scopes_supported": [
    "openid"
  ],
  "claims_supported": [
    "name",
    "given_name",
    "family_name",
    "address",
    "phone_number",
    "birth_date",
    "picture",
    "preferred_name",
    "govtid",
    "govtid_expired",
    "ip_location"
  ],
  "claim_types_supported": [
    "normal"
  ],
  "id_token_signing_alg_values_supported": [
    "ES256"
  ],
  "grant_types_supported": [
    "authorization_code"
  ],
  "response_modes_supported": [
    "query"
  ]
}
Validating the id_token
To ensure the id_token is not tampered with, you may opt to do additional validation of the id_token.
In this case, validation can be done using the key information from the jwks endpoint.
Before we can modify the code to also perform validation, you will the following JS libraries: axios and jose.
You can install it from command line via:
npm install axios jose
Now we can introduce a function that verifies the id_token as shown below:
const { importJWK } = require("jose");
const axios = require("axios");

async function verifyIdToken(token) {
    try {
        // Fetch the JWKS info from the jwks endpoint
        const { data: jwks } = await axios.get("https://nametag.co/.well-known/jwks");
        const key = jwks.keys[0];
        const algorithm = key.alg;

        if (!key) {
            throw new Error("Key not found in JWKS");
        }

        if (!algorithm) {
            throw new Error("Algorithm not found in JWKS response");
        }


        // Get public key for verification and verify the token
        const publicKey = await importJWK(key, algorithm);
        const decoded = jwt.verify(token, publicKey, { algorithms: [algorithm] });

        return true
    } catch (error) {
        console.error("JWT verification failed:", error.message);
        return false
    }
}
Modify handleCallback() once more to invoke this verification and display the result alongside the decoded token:
async function handleCallback(url, req, res) {
  const code = url.searchParams.get("code")

  // make a request to the token endpoint to exchange the code for an
  // id_token and other information about the person.
  let requestBody = new FormData()
  requestBody.append("grant_type", "authorization_code")
  requestBody.append("client_id", client_id)
  requestBody.append("client_secret", client_secret)
  requestBody.append("redirect_uri", "http://localhost:9000/callback")
  requestBody.append("code", code)
  let tokenResponse = await fetch("https://nametag.co/oauth2/token", {
      method: "POST",
      body: requestBody
  })
  let tokenResponseBody = await tokenResponse.json()
  const id_token = tokenResponseBody.id_token
  const decoded = jwt.decode(id_token);
  const verifyResult = await verifyIdToken(id_token)
  res.writeHead(200, { "Content-Type": "text/html" });
  res.write(`<html><body><h1>id_token</h1><pre>${JSON.stringify(decoded, null, 2)}</pre>`);
  if (verifyResult){
    res.write("<pre>verified</pre>")
  } else {
    res.write("<pre>verification failed</pre>")
  }
  res.write("</body></html>")
  res.end();
}
Restart the server once again and you can now re-run the login flow and see the id_token and its verification status as a result.
Putting it all together
Here is the full example program that you can run on your computer using Node.
/**
 * Copyright 2025 Nametag Inc.
 *
 * All information contained herein is the property of Nametag Inc.. The
 * intellectual and technical concepts contained herein are proprietary, trade
 * secrets, and/or confidential to Nametag, Inc. and may be covered by U.S.
 * and Foreign Patents, patents in process, and are protected by trade secret or
 * copyright law. Reproduction or distribution, in whole or in part, is
 * forbidden except by express written permission of Nametag, Inc.
 */

const http = require("http");
const jwt = require("jsonwebtoken");
const { importJWK } = require("jose");
const axios = require("axios");

const host = 'localhost';
const port = 9000;

const client_id = "CLIENT-ID";
const client_secret = "CLIENT-SECRET";
var request_uri

// Define the ClaimsRequestParameter object
class ClaimsRequestParameter {
    constructor() {
        this.id_token = {};
    }

    // Method to add a claim request to the id_token map
    addClaim(key, claimRequest) {
        this.id_token[key] = claimRequest;
    }
}

// Define the ClaimRequest object
// You can use this to check for claim value binding.
// A claim will be checked to see if it is either equal to a value provided
// or equal to at least one of the provided list of values. Cannot use both for a claim.
// If not used and instead the claim is requested with a null, it will be returned back with whatever value it has.
class ClaimRequest {
    constructor(value = null, values = null) {
        this.value = value;
        this.values = values;
    }
}

async function verifyIdToken(token) {
    try {
        // Fetch the JWKS info from the jwks endpoint
        const { data: jwks } = await axios.get("https://nametag.co/.well-known/jwks");
        const key = jwks.keys[0];
        const algorithm = key.alg;

        if (!key) {
            throw new Error("Key not found in JWKS");
        }

        if (!algorithm) {
            throw new Error("Algorithm not found in JWKS response");
        }


        // Get public key for verification and verify the token
        const publicKey = await importJWK(key, algorithm);
        const decoded = jwt.verify(token, publicKey, { algorithms: [algorithm] });

        return true
    } catch (error) {
        console.error("JWT verification failed:", error.message);
        return false
    }
}

async function handleCallback(url, req, res) {
    const code = url.searchParams.get("code")

    // make a request to the token endpoint to exchange the code for an
    // id_token and other information about the person.
    let requestBody = new FormData()
    requestBody.append("grant_type", "authorization_code")
    requestBody.append("client_id", client_id)
    requestBody.append("client_secret", client_secret)
    requestBody.append("redirect_uri", "http://localhost:9000/callback")
    requestBody.append("code", code)
    let tokenResponse = await fetch("https://nametag.co/oauth2/token", {
        method: "POST",
        body: requestBody
    })
    let tokenResponseBody = await tokenResponse.json()
    const id_token = tokenResponseBody.id_token
    const decoded = jwt.decode(id_token);
    const verifyResult = await verifyIdToken(id_token)
    res.writeHead(200, { "Content-Type": "text/html" });
    res.write(`<html><body><h1>id_token</h1><pre>${JSON.stringify(decoded, null, 2)}</pre>`);
    if (verifyResult){
        res.write("<pre>verified</pre>")
    } else {
        res.write("<pre>verification failed</pre>")
    }
    res.write("</body></html>")
    res.end();
}

// requestListener is the main request handler
async function requestListener(req, res) {
    // Very simple request routing. In real life, you'd use something
    // from a framework or library.
    const url = new URL(req.url, `http://${req.headers.host}`)
    if (url.pathname == "/callback") {
        return handleCallback(url, req, res)
    }

    // craft a request for the /par endpoint that requests the `openid` scope and `name` claim
    // We encode the current URL as `state` so that we know where to redirect, but you
    // can use whatever you like there.
    const claimsRequestParam = new ClaimsRequestParameter();
    claimsRequestParam.addClaim("name", null);
    const jsonString = JSON.stringify(claimsRequestParam);

    const body = new URLSearchParams();
    body.append("client_id", client_id);
    body.append("client_secret", client_secret);
    body.append("redirect_uri", "http://localhost:9000/callback");
    body.append("state", req.url);
    body.append("scope", "openid");
    body.append("claims", jsonString);

    try {
        const response = await fetch("https://nametag.co/oauth2/par", {
            method: "POST",
            body: body,
            headers: { "Content-Type": "application/x-www-form-urlencoded" },
        });

        if (response.status === 200) {
            const result = await response.json();
            const request_uri = result.request_uri;

            const query = new URLSearchParams();
            query.set("request_uri", request_uri);

            const authorize_url = `https://nametag.co/oauth2/authorize?` + query.toString();

            res.writeHead(200, { "Content-type": "text/html" });
            res.write(`<html><a href="${authorize_url}">Log in</a></html>`);
            res.end();
        } else {
            const errorText = await response.text(); // Capture the response body for non-200 statuses

            res.writeHead(response.status, { "Content-type": "application/json" });
            res.write(
                JSON.stringify({
                    error: "Request to /par endpoint failed",
                    status: response.status,
                    response: errorText,
                })
            );
            res.end();
        }
    } catch (error) {
        // Handle errors during the request
        console.error("Error during request:", error);
        res.writeHead(500, { "Content-type": "application/json" });
        res.write(
            JSON.stringify({
                error: "Internal server error",
                details: error.message,
            })
        );
        res.end();
    }
}


const server = http.createServer(requestListener);
server.listen(port, host, () => {
    console.log(`listening on http://${host}:${port}`);
});