Nametag Integration for Workday
Run identity verification requests from and view the results directly in Workday
Audience: Workday Administrators installing and configuring the Nametag Integration for Workday
Overview
The Nametag Integration for Workday enables identity verification (IDV) of people as part of Workday Business Processes.
This document outlines how to install and configure the Nametag Integration for Workday.
If you’re already familiar with Workday integrations, skip to the Installation Summary.
Summary
The installation and configuration process proceeds as follows:
- Install the Nametag Workday Studio Integration System into Workday.
- Configure the Nametag Console with various parameters from Workday.
- Configure the Nametag Workday Studio Integration System with various parameters from Nametag.
- Deploy the Nametag Integration into various Business Processes as required for your use case.
Throughout installation and configuration, you must collect several pieces of information required to configure Nametag to use Workday Public Web Services. You must also collect a few pieces of information from Nametag to configure the Nametag Integration System in Workday. Here’s a list you can copy-paste into a text file to fill in as you go through the installation and configuration process:
Workday Configurations for Nametag:

REST API Endpoint:
Human Resources SOAP Bind Address:
Recruiting SOAP Bind Address:
OAuth Client ID:
OAuth Client Secret:
OAuth Non-Expiring Refresh Token:

====================================

Nametag Configurations for Workday:

Nametag API Endpoint: https://nametag.co/api/integrations/workday/requests
Nametag API Key:
Workday Integration ID:
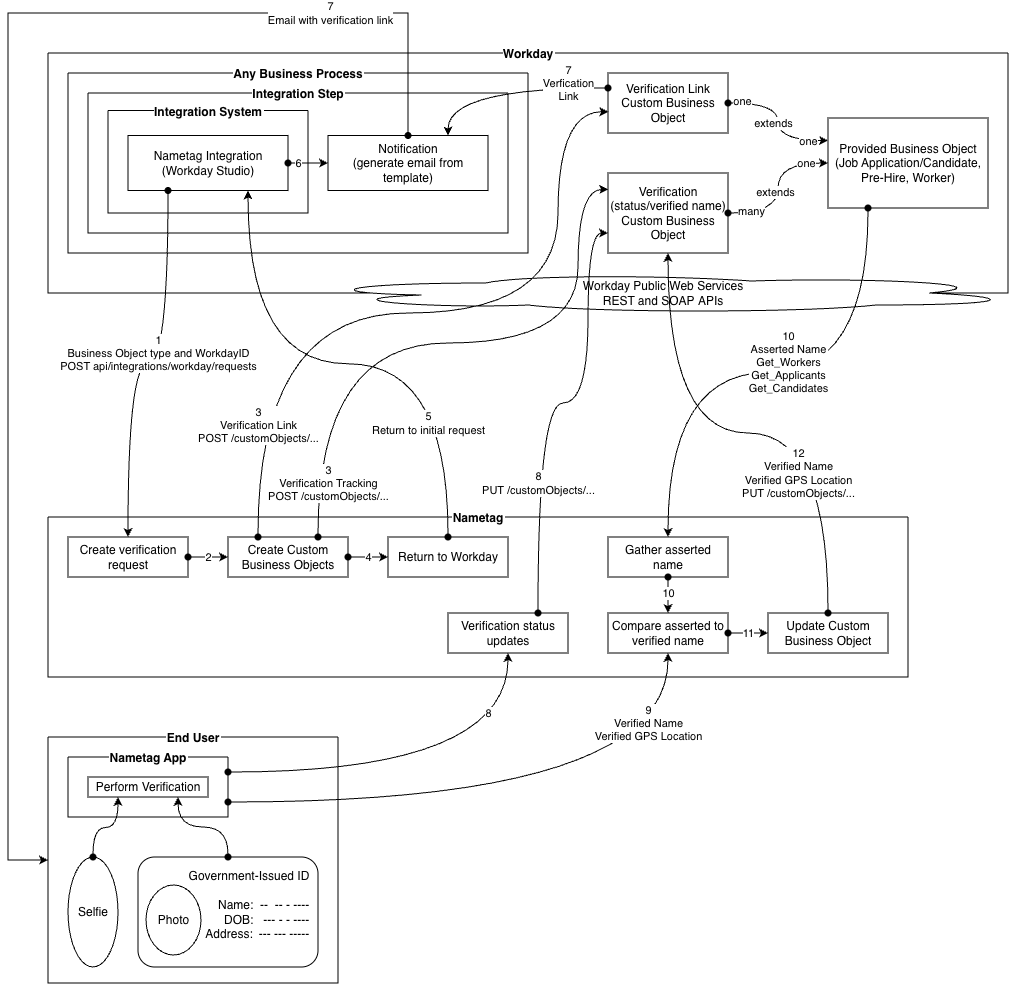
Architecture
Nametag provides a Workday Studio integration which can be installed and configured as an Integration Step in Business Processes that operate on at least one of the following Provided Business Objects:
- Job Application (and its associated Candidate)
- Pre-Hire
- Worker
When the Nametag Integration is fired during Business Process execution,
- The Workday Studio Integration sends an HTTP request to Nametag to initiate an Identity Verification (IDV) request for a given Worker, Job Application, or Pre-Hire.
- Nametag uses Workday Public Web Services to set the value of the verification link as stored in a single-instance Custom Business Object in Workday.
- The verification link may be delivered from Workday via a Notification email configured in the usual way as an on-exit notification event.
- After the verification is complete, Nametag writes the verified legal name and GeoIP data to the multi-instance Custom Business Object.
Installation
Summary
- CLAR: Import the Nametag CLAR file from Nametag support into Workday Studio and deploy it. This creates the Nametag Integration System.
- ISU: Create an Integration System User (
Session Timeout = 0,Do Not Allow UI Sessions = checked). No UI access needed; Nametag authenticates via OAuth. - ISSG: Create an unconstrained Integration System Security Group, assign the ISU, and grant domain permissions for Worker, Pre-Hire, and Job Application data (Get/Put on personal data and names; View on staffing/recruiting).
- API Client: Register an API Client for Integrations with non-expiring refresh tokens and scopes:
Contact Information,Personal Data,Pre-Hire Process,Recruiting,Staffing,Talent Pipeline. Generate and record the Client ID, Client Secret, and a Refresh Token for the ISU. - SOAP endpoints: From the Public Web Services report, extract the
soapbind:addresslocation from the HR and Recruiting WSDLs. - Custom Business Objects: For each Provided Business Object you’ll use (Worker, Pre-Hire, Job Application), create two Custom Objects with exact Web Service Aliases (e.g.,
nametagVerificationLinkForWorker,nametagVerificationForWorker). The Nametag Verification Link Custom Object is single-instance with onelinkfield. The Nametag Verification Custom Object is multi-instance with several fields (see field tables below). Assign the appropriate Security Domains to each. - Nametag Console: Under Configure > Integrations, add a Workday integration using the REST API endpoint, SOAP bind addresses, OAuth Client ID, Client Secret, and Refresh Token. Record the generated
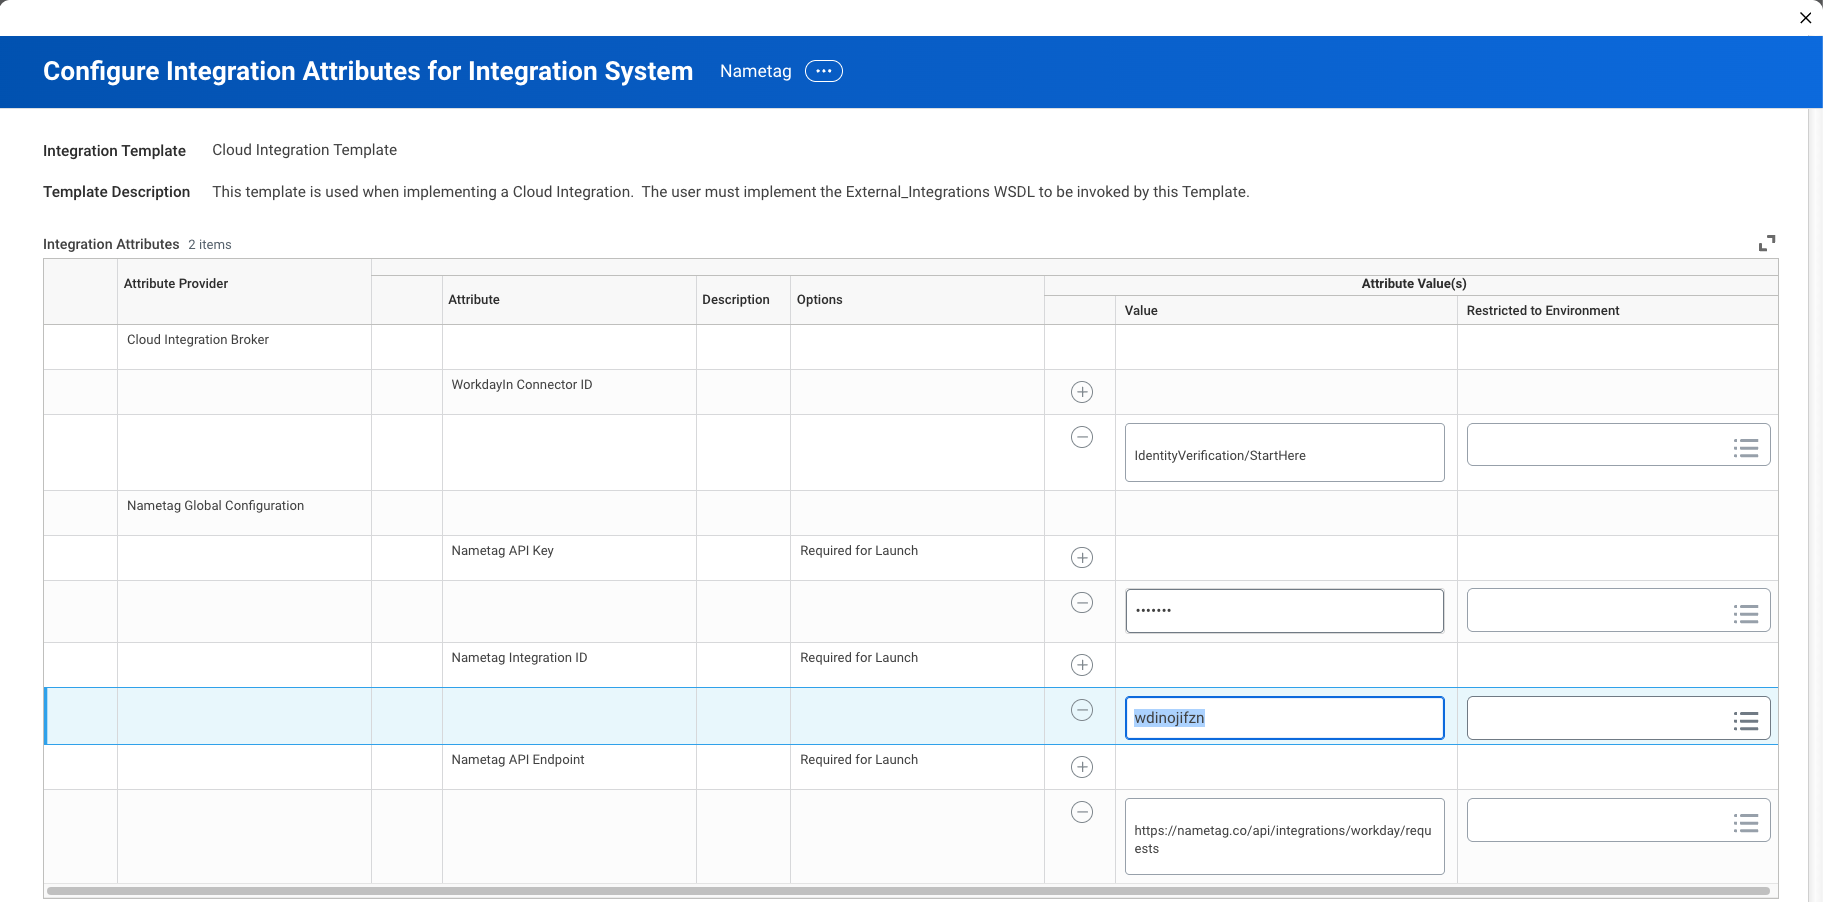
wdi...Integration ID. Also create an API key (Role: User) and record it. - Integration System Attributes: In Workday, configure the Nametag Integration System with the Nametag API Endpoint, API Key, and Integration ID.
- Business Process: Add the Nametag Integration as an Integration Step. Required parameters:
Workday Object TypeandWorkday Object ID; if using Job Application, also provideCandidate ID. Optionally pass aTemplateto customize the verification experience. To deliver the verification link via email, create a Calculated Field for the Nametag Verification Link Custom Object, a memberless Security Group, and an on-exit Notification on the integration step. - Troubleshoot: Use the Integration Events Report for HTTP-level errors. For request-level issues, look up the
Request IDfrom the Additional Data of the Workday object and search for it in the Nametag Console.
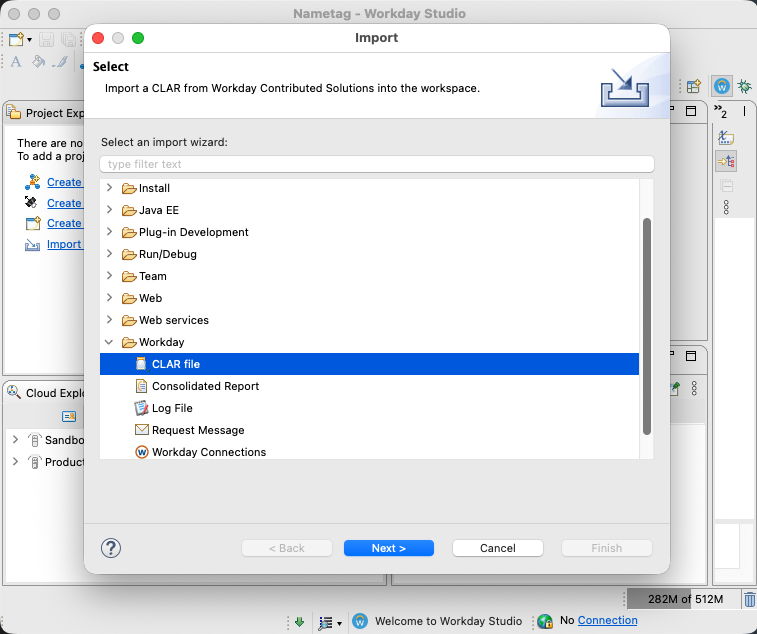
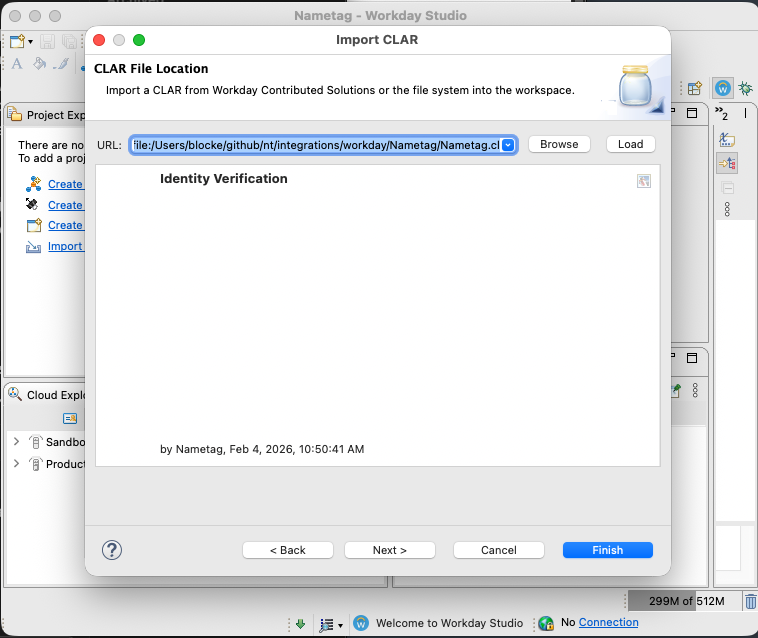
CLAR
Nametag Support will deliver a CLAR file to you.
If you have not received this file, reach out to Nametag Support at support@nametag.co.
The CLAR file contains definitions for a Cloud Collection called “Nametag” and an integration system named “Nametag”.
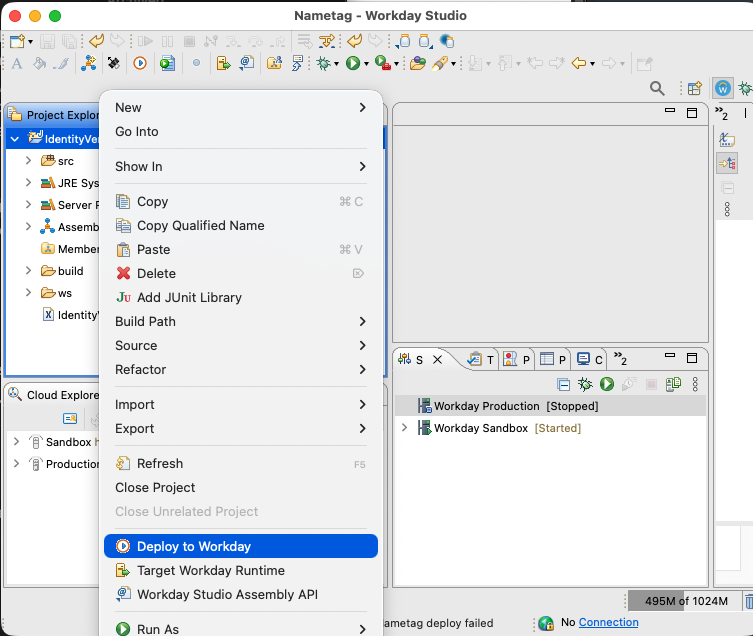
Import this CLAR file into Workday Studio and upload it as usual:
- Open Workday Studio.
- Import Workday Project from CLAR file.
- Deploy to Workday.
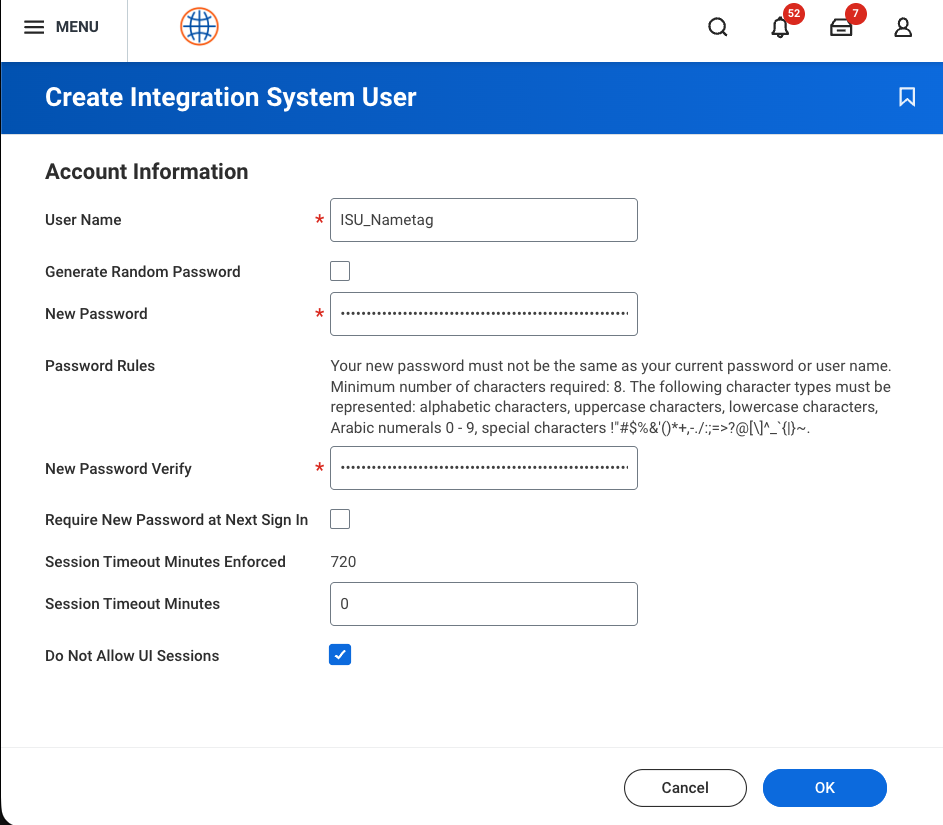
Integration System User (ISU)
Run the Create Integration System User task with the following parameters:
| Parameter | Value |
|---|---|
| User Name | Anything you’d like that identifies this as the Nametag ISU |
| Generate Random Password | Unchecked. You cannot use this for ISUs. |
| New Password | Use a secure password. Nametag, however, uses OAuth authentication to interact with the Workday API, so Nametag does not need this password. |
| Require New Password at Next Sign In | Unchecked |
| Session Timeout Minutes | 0 (zero) |
| Do Not Allow UI Sessions | Checked |
Integration System Security Group (ISSG)
Run the Create Security Group task with the following parameters:
| Parameter | Value |
|---|---|
| Type of Tenanted Security Group | Integration System Security Group (unconstrained) |
| Name | Anything you’d like that identifies this as the Nametag ISSG |
| Integration System Users | Assign the Nametag ISU you just created |
Run the Maintain Permissions for Security Group task and add the following Domain Security Policies to the ISSG:
| Operation | Domain Security Policy | Functional Areas | Notes |
|---|---|---|---|
| View and Modify | Worker Data: Public Worker Reports |
Staffing |
For Get_Workers. Your tenant may not require Modify. |
| Get Only | Worker Data: Public Worker Reports |
Staffing |
For Get_Workers. |
| Get and Put | Person Data: Legal Name |
Contact Information |
For Worker Nametag Verification Custom Objects. |
| Get and Put | Person Data: Personal Information |
Personal Data |
For Worker Nametag Verification and Nametag Verification Link Custom Objects. |
| View and Modify | Manage Pre-Hire Process: Manage Pre-Hires |
Pre-Hire Process |
For Get_Applicants. Your tenant may not require Modify. |
| Get Only | Manage Pre-Hire Process: Manage Pre-Hires |
Pre-Hire Process |
For Get_Applicants. |
| Get and Put | Pre-Hire Personal Data: Personal Information |
Pre-Hire Process |
For Pre-Hire Nametag Verification and Nametag Verification Link Custom Objects. |
| Get and Put | Pre-Hire Data: Names |
Pre-Hire Process |
For Pre-Hire Nametag Verification Custom Objects. |
| View and Modify | Candidate Data: Job Application |
Recruiting |
For Get_Candidates. Your tenant may not require Modify. |
| View and Modify | Prospects |
Recruiting, Talent Pipeline |
For Get_Candidates. Your tenant may not require Modify. |
| Get Only | Prospects |
Recruiting, Talent Pipeline |
For Get_Candidates. |
| Get and Put | Candidate Data: Job Application |
Recruiting |
For Job Application Nametag Verification and Nametag Verification Link Custom Objects. |
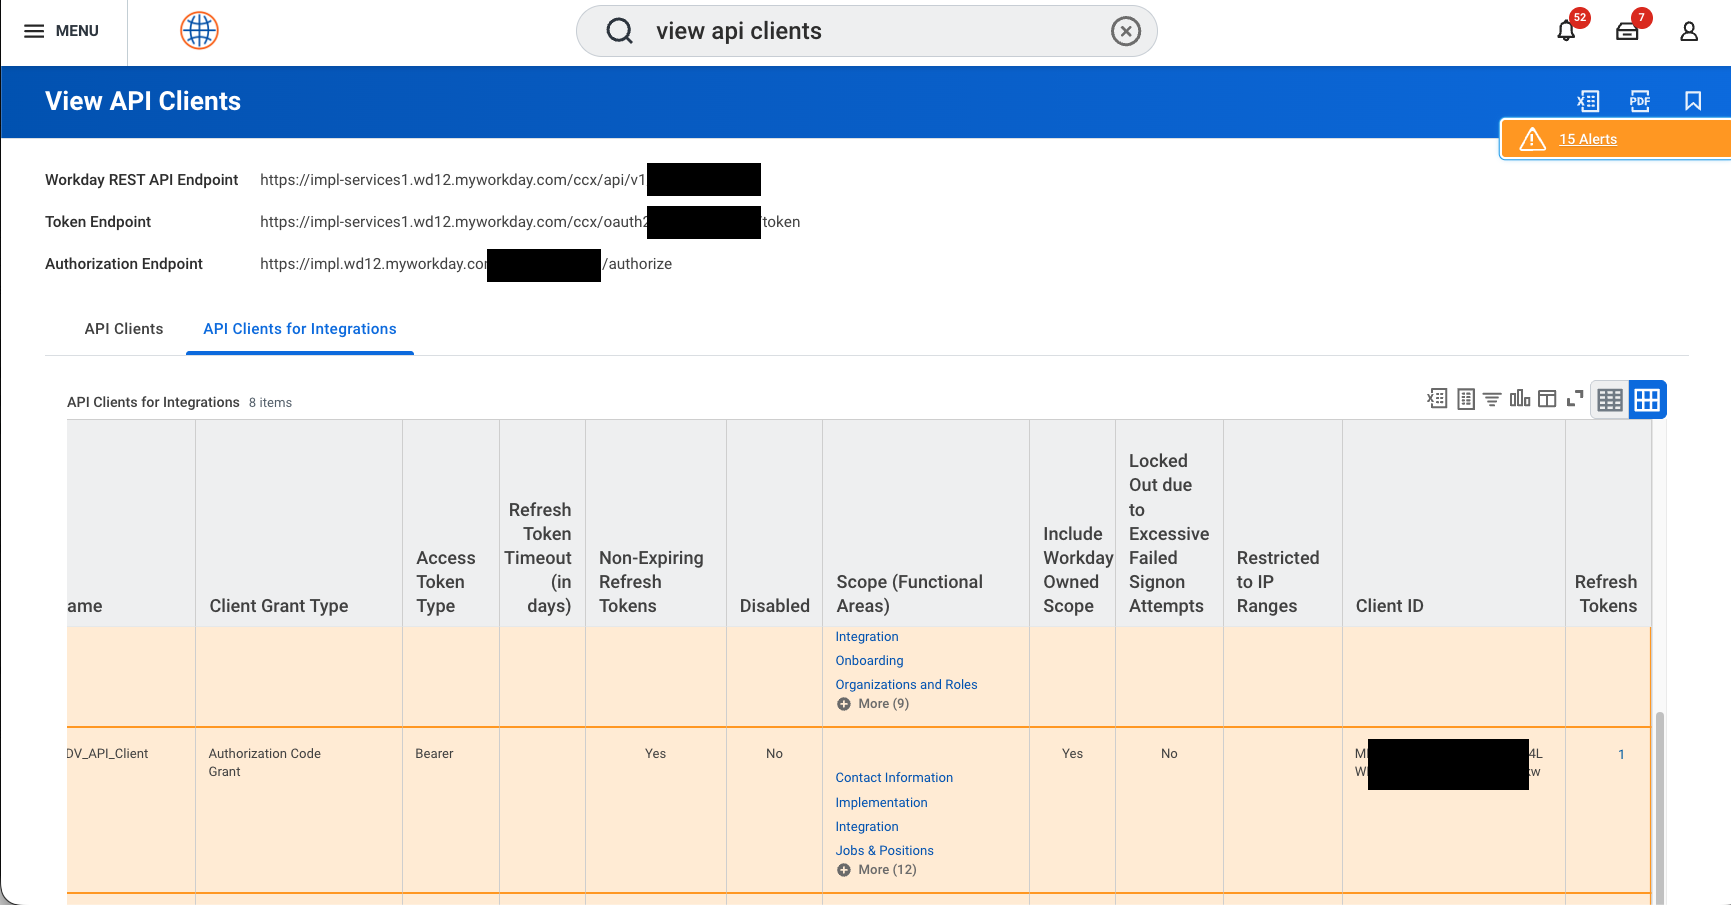
API Client Registration
Run the Register API Client for Integrations task with the following parameters:
| Parameter | Value |
|---|---|
| Client Name | Anything you’d like that identifies this as the Nametag API Client |
| Enforce Customized Access Token Expiry | Unchecked |
| Refresh Token Timeout (in days) | 0 (zero) |
| Non-Expiring Refresh Tokens | Checked |
| Disabled | Unchecked |
| Scope | Contact Information, Personal Data, Pre-Hire Process, Recruiting, Staffing, Talent Pipeline |
| Include Workday Owned Scopes | Unchecked |
| Locked Out due to Excessive Failed Signon Attempted | Unchecked |
| Restricted to IP Ranges | (none) |
API Client Configuration
- Run the
View API Clientsreport. - Select the
API Clients for Integrationstab. - Record the Client ID for the API Client you just created. You must give this to Nametag when configuring the Integration.
- Also record Workday REST API Endpoint and Token Endpoint at the top of the page. These are required to configure Nametag to invoke Workday Public Web Services.
- Go to More Actions on the Nametag API Client > API Client > Generate New Client Secret.
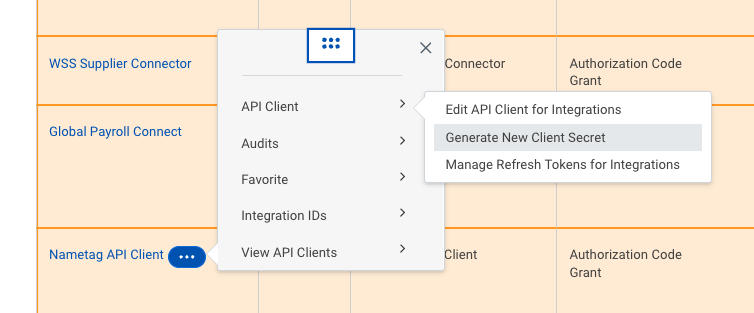
- Check Confirm.
- Record the Client Secret. You will need it to configure Nametag to use Workday Public Web Services.
- Select Done.
- Go to More Actions on the Nametag API Client > API Client > Manage Refresh Tokens for Integrations.
- Select the Nametag ISU.
- Check Generate New Refresh Token.
- Select OK.
- Record the generated Refresh Token. You will need it to configure Nametag to use Workday Public Web Services.
- Select Done.
Custom Object Definitions
Nametag writes data back to Workday using Custom Business Objects. You must create two Custom Business Object definitions on each of the relevant Provided Business Objects you intend to operate on. Nametag supports the following Provided Business Objects: Job Application, Pre-Hire, and Worker.
For each Provided Business Object, the fields on the two Custom Business Objects are the same. However, the names (and, most importantly, the Web Service Aliases) of the Custom Business Objects, themselves, differ depending on the Provided Business Object.
The Custom Business Objects each serve a different purpose:
- Nametag Verification Link — This is a single-instance Custom Business Object that holds the most-recently-created verification link for the given Provided Business Object. This field may be used in Business Processes to create Notifications; for instance, to send an email containing the verification link to the end user.
- Nametag Verification — This is a multi-instance Custom Business Object that contains the status, link, ID, verified legal name, and GeoIP data for each verification for the given Provided Business Object.
The Custom Object Web Service Alias must be exactly the following for each Provided Business Object:
| Provided Business Object | Nametag Verification Link Web Service Alias | Nametag Verification Web Service Alias |
|---|---|---|
| Job Application | nametagVerificationLinkForJobApplication |
nametagVerificationForJobApplication |
| Pre-Hire | nametagVerificationLinkForPrehire |
nametagVerificationForPrehire |
| Worker | nametagVerificationLinkForWorker |
nametagVerificationForWorker |
Assign the following Security Domains to each Custom Object:
| Provided Business Object | Nametag Verification Link Custom Object | Nametag Verification Custom Object |
|---|---|---|
| Job Application | Candidate Data: Job Application |
Candidate Data: Job Application |
| Pre-Hire | Pre-Hire Personal Data: Personal Information |
Pre-Hire Personal Data: Personal Information, Pre-Hire Data: Names |
| Worker | Person Data: Personal Information |
Person Data: Personal Information, Person Data: Legal Name |
Here is an example of the two Custom Objects for a Job Application:
Custom Object Field Definitions for Nametag Verification Link
The Nametag Verification Link Custom Object is a single-instance Custom Object with a single field.
Custom Object Web Service Aliases: nametagVerificationLinkForJobApplication, nametagVerificationLinkForPrehire, nametagVerificationLinkForWorker.
For each of the Provided Business Objects you intend to use Nametag for, run the Create Custom Object task and
create a Custom Object with the appropriate aliases listed above and field as enumerated in the table below:
| Field Name | Web Service Alias | Type | Is Display Value? |
|---|---|---|---|
Link |
link |
Text |
Yes |
Custom Object Field Definitions for Nametag Verification
The Nametag Verification Custom Object is a multi-instance Custom Object with several fields describing the status of a verification.
Custom Object Web Service Aliases: nametagVerificationForJobApplication, nametagVerificationForPrehire, nametagVerificationForWorker.
For each of the Provided Business Objects you intend to use Nametag for, run the Create Custom Object task and
create a Custom Object with the appropriate aliases listed above and fields as enumerated in the table below:
| Field Name | Web Service Alias | Field Type | Is Display Value? | Is Reference ID? |
|---|---|---|---|---|
Status |
nametagVerificationStatus |
Text |
No |
No |
Request ID |
requestId |
Text |
Yes |
Yes |
Verification Details |
verificationDetails |
Text |
No |
No |
Verified Legal Name |
verifiedLegalName |
Text |
No |
No |
Name Match |
nameMatch |
Text |
No |
No |
Verified GPS Location |
verifiedGpsLocation |
Text |
No |
No |
Public Web Services Endpoints
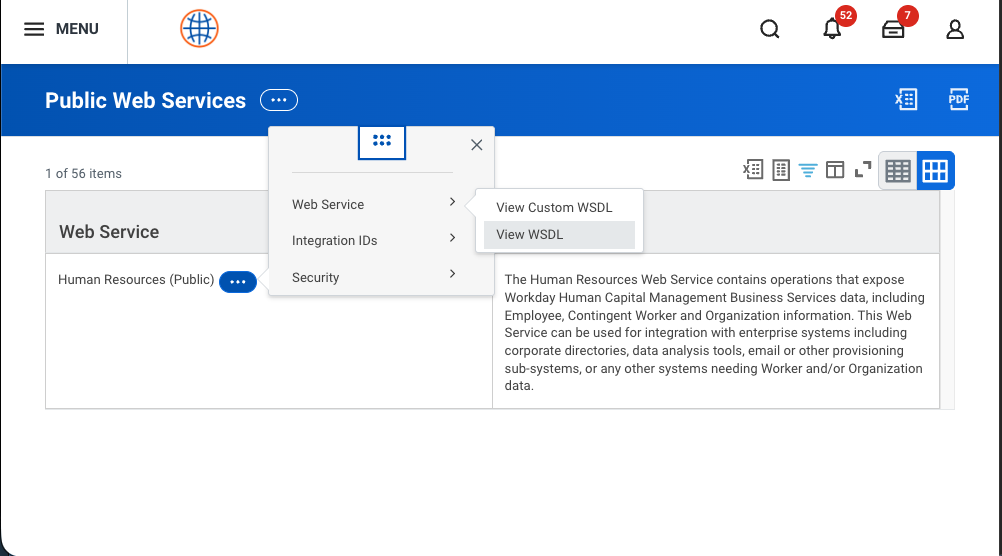
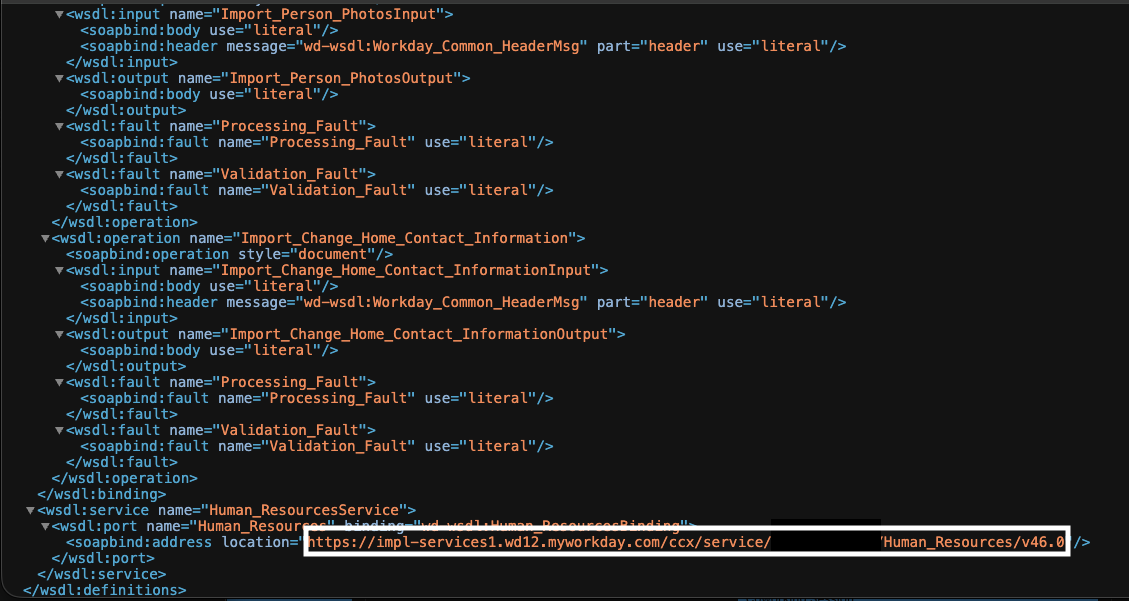
Run the Public Web Services report to extract the SOAP bind addresses for Human Resources and Recruiting APIs:
View WSDLfor Human Resources. Extract thelocationattribute of thesoapbind:addresselement. This element is typically the final element of the WSDL.View WSDLfor Recruiting. Extract thelocationattribute of thesoapbind:addresselement. This element is typically the final element of the WSDL.
Save these two SOAP bind addresses. You will need them to configure Nametag to use Workday’s Public Web Services.
Configuration
After the Nametag Integration System has been installed, several configurations must occur both in the Nametag Console and in Workday.
Nametag integration
After the ISU, ISSG, and API Client are configured, you are ready to give the relevant information to Nametag:
- Sign in to the Nametag Console.
- Go to the Configure tab.
- Go to Integrations on the left. If you do not see Integrations, contact Nametag Support.
- Select Add integration.
- Select Workday.
- Enter the parameters you have been gathering throughout this process. You may put anything you want for Name.
- Select Save configuration.
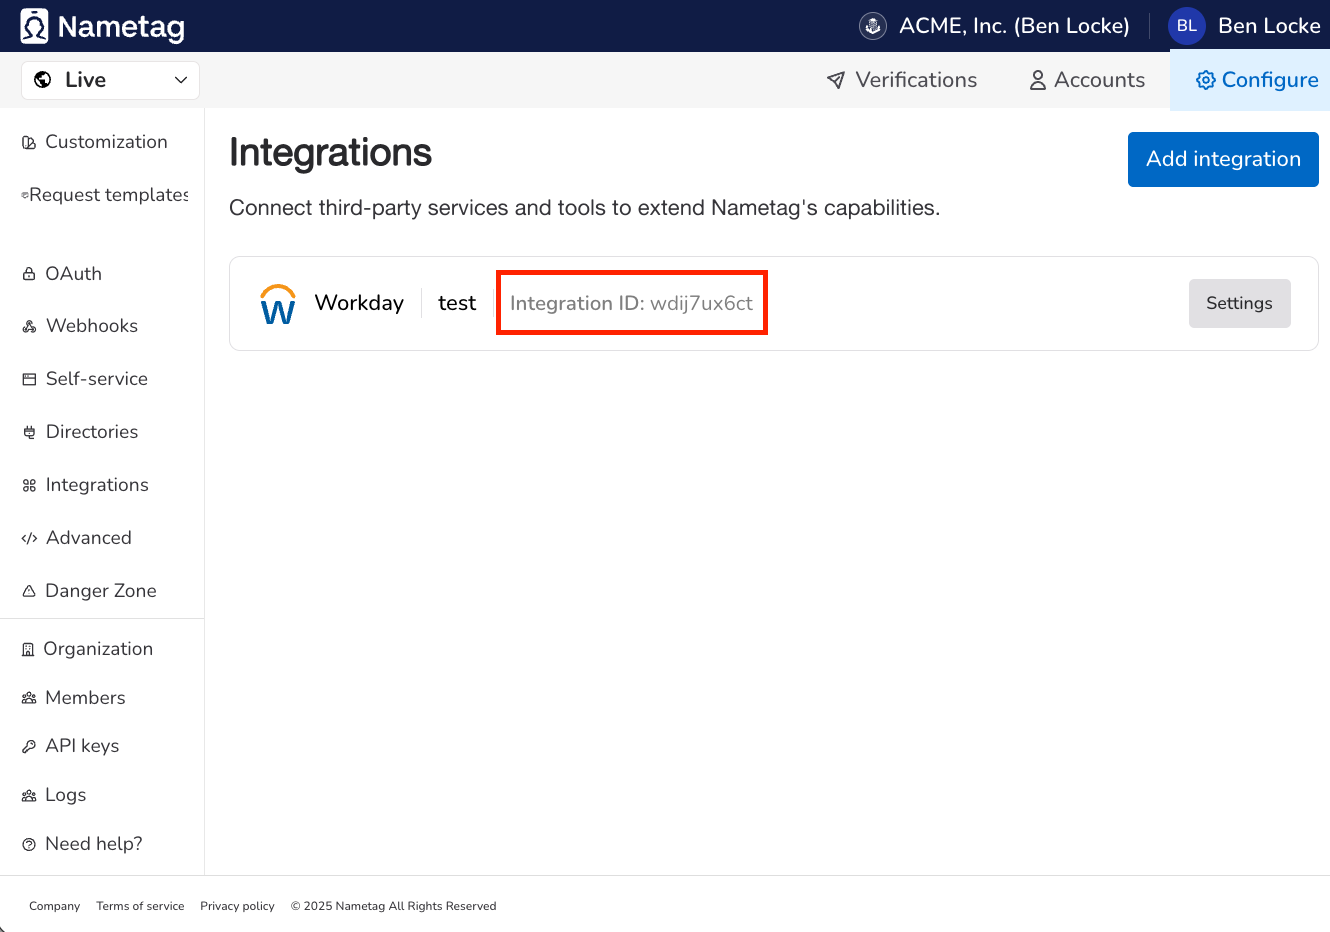
- Note the Integration ID generated by Nametag. It will start with
wdi.... You will need this when configuring the Nametag Integration System in Workday.
Nametag API Key
The Nametag Workday Integration requires an API key to communicate with Nametag.
- Sign in to the Nametag Console.
- Go to the Configure tab.
- Go to API keys on the left.
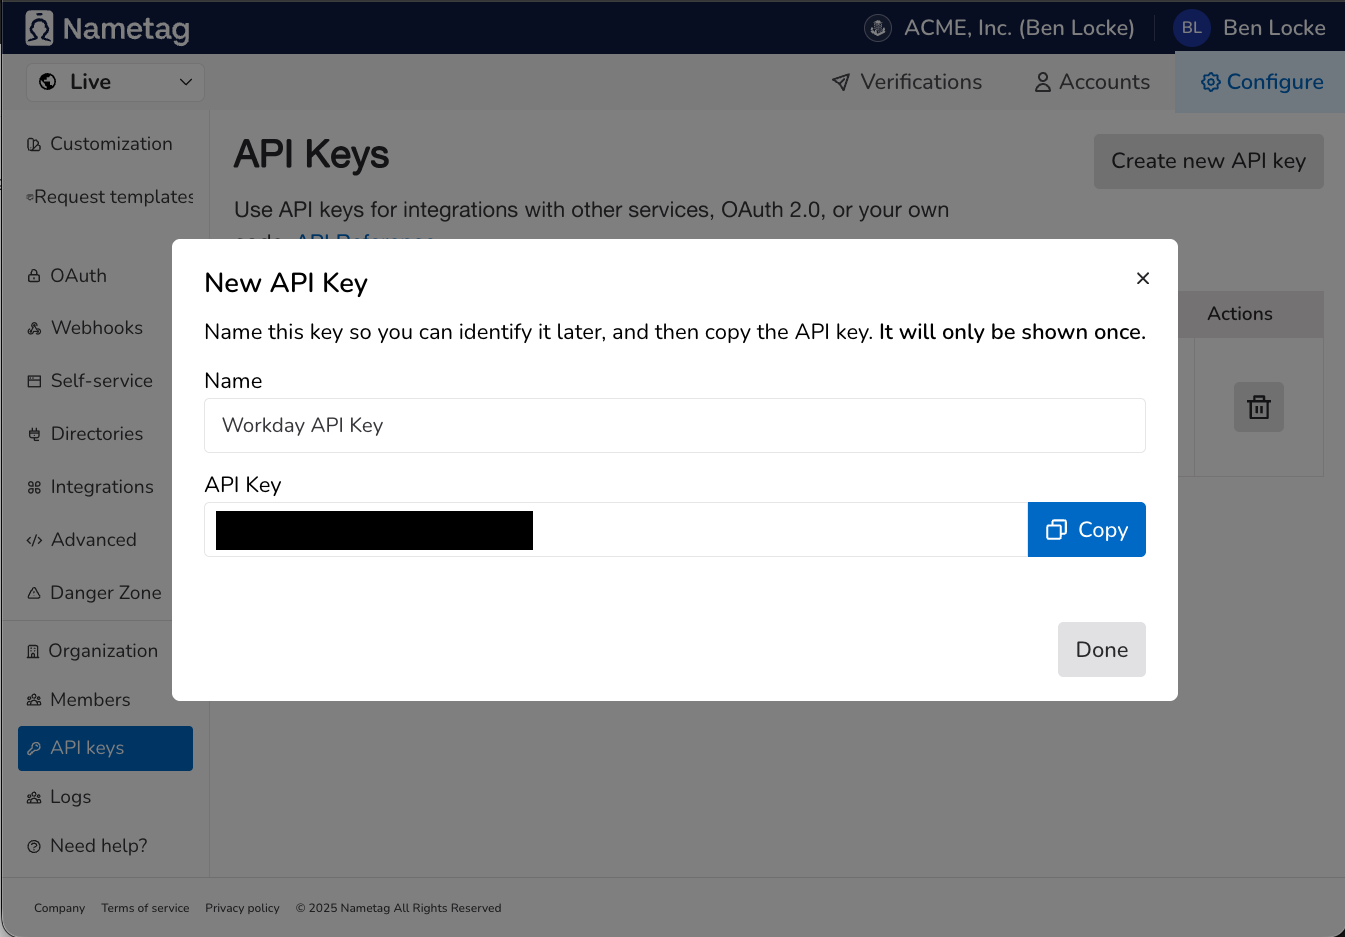
- Select Create new API key. Ensure you record the API Key value; you will need to provide this as an Integration System Attribute for the Nametag Integration System in Workday.
- Ensure the API key has Role of User, Admin, or Owner (User is preferred, though Admin is selected by default).
- Ensure the correct Environments are selected. Select either All environments or the current environment (given in the dropdown list at the top left).

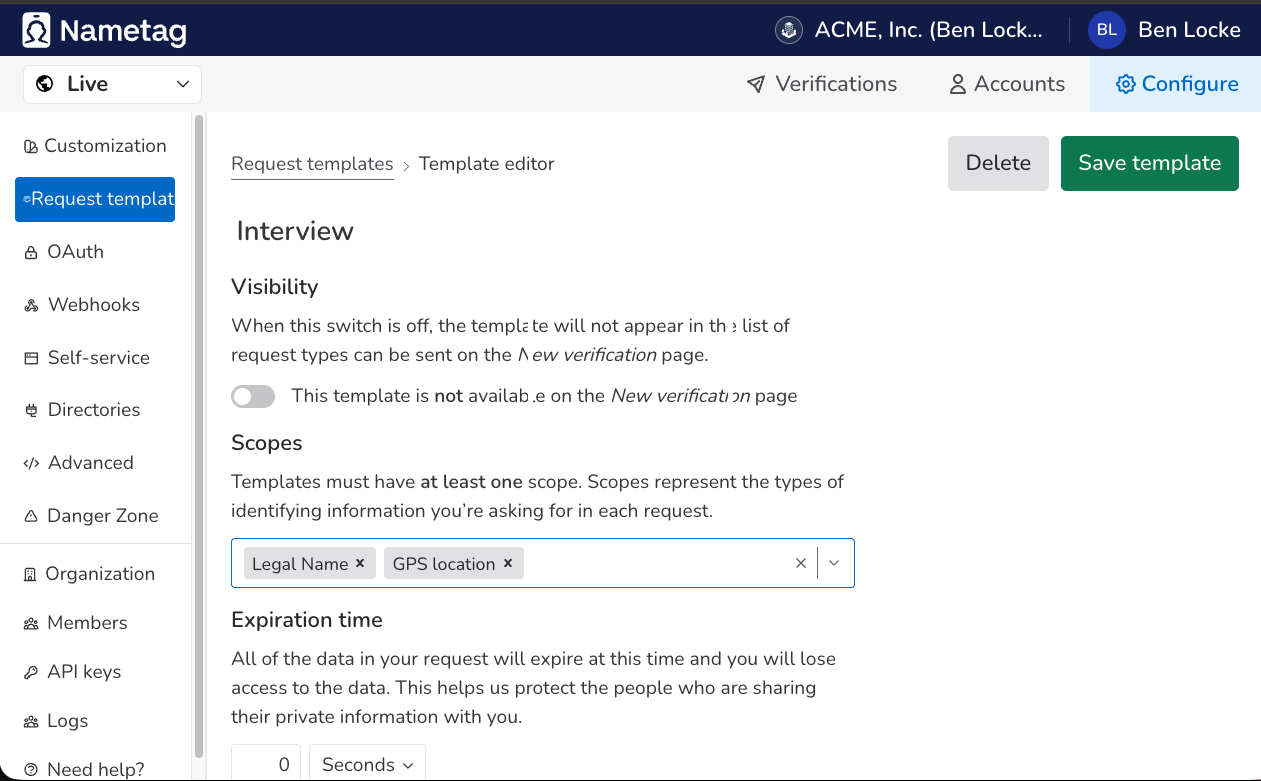
Nametag template
For a given identity verification request, Nametag collects several configurable claims about the person. A person’s legal name and GPS location can be surfaced in Workday on the Custom Object. If legal name is collected, Nametag uses a proprietary algorithm to compare the legal name in Workday to the legal name collected during identity verification to determine whether both names refer to the same individual.
Create a Nametag request template to configure the claims collected for a given verification. The template name is passed as an Integration Parameter to the Nametag Integration Step in a Business Process. This allows, for instance, a different set of claims to be collected for interviews and for onboarding.
To create a Nametag request template, sign in to the Nametag Console, go to Configure, and then Request Templates.
Only the following two claims are uploaded to the Custom Object in Workday: Legal Name and GPS location.
In the example below, both supported claims are added to the template, and the Business Process Integration
Step parameter Template is set to Interview.
Integration System Configuration
The Nametag Integration System in Workday must be configured so it can communicate with the Nametag API.
- In Workday, run the
View Integration Systemtask. - Select the Nametag Integration System.
- Go to More Actions > Integration System > Configure Integration Attributes.
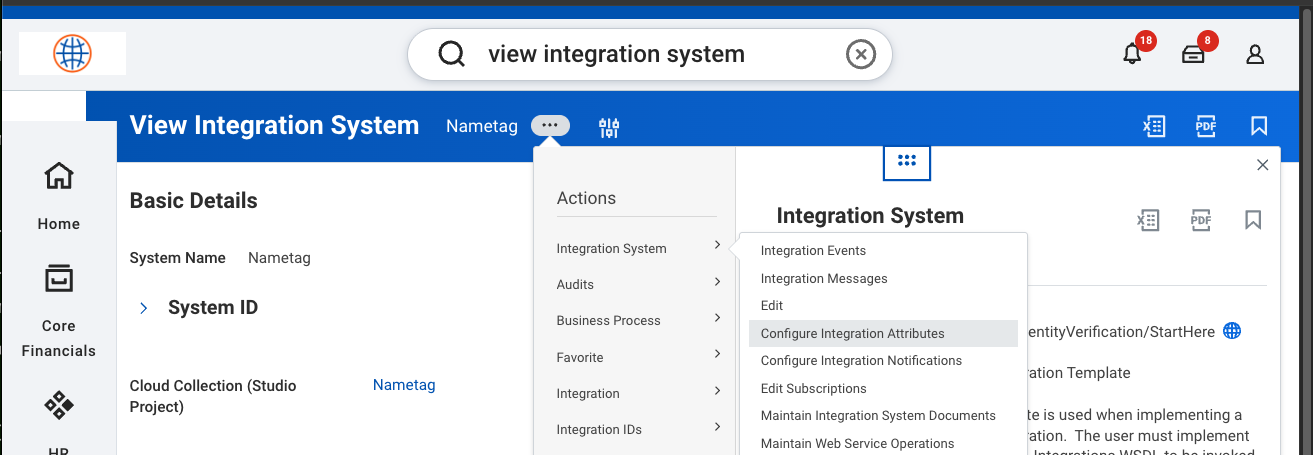
- Update the Nametag API Key, Nametag API Endpoint, and Nametag Integration ID from the values gathered earlier.
- Press OK.
Business Process Integration
The Nametag Integration can be invoked in a Business Process as an Integration Step. Your business use case dictates the Business Process(es) in which you’ll configure the Nametag Integration.
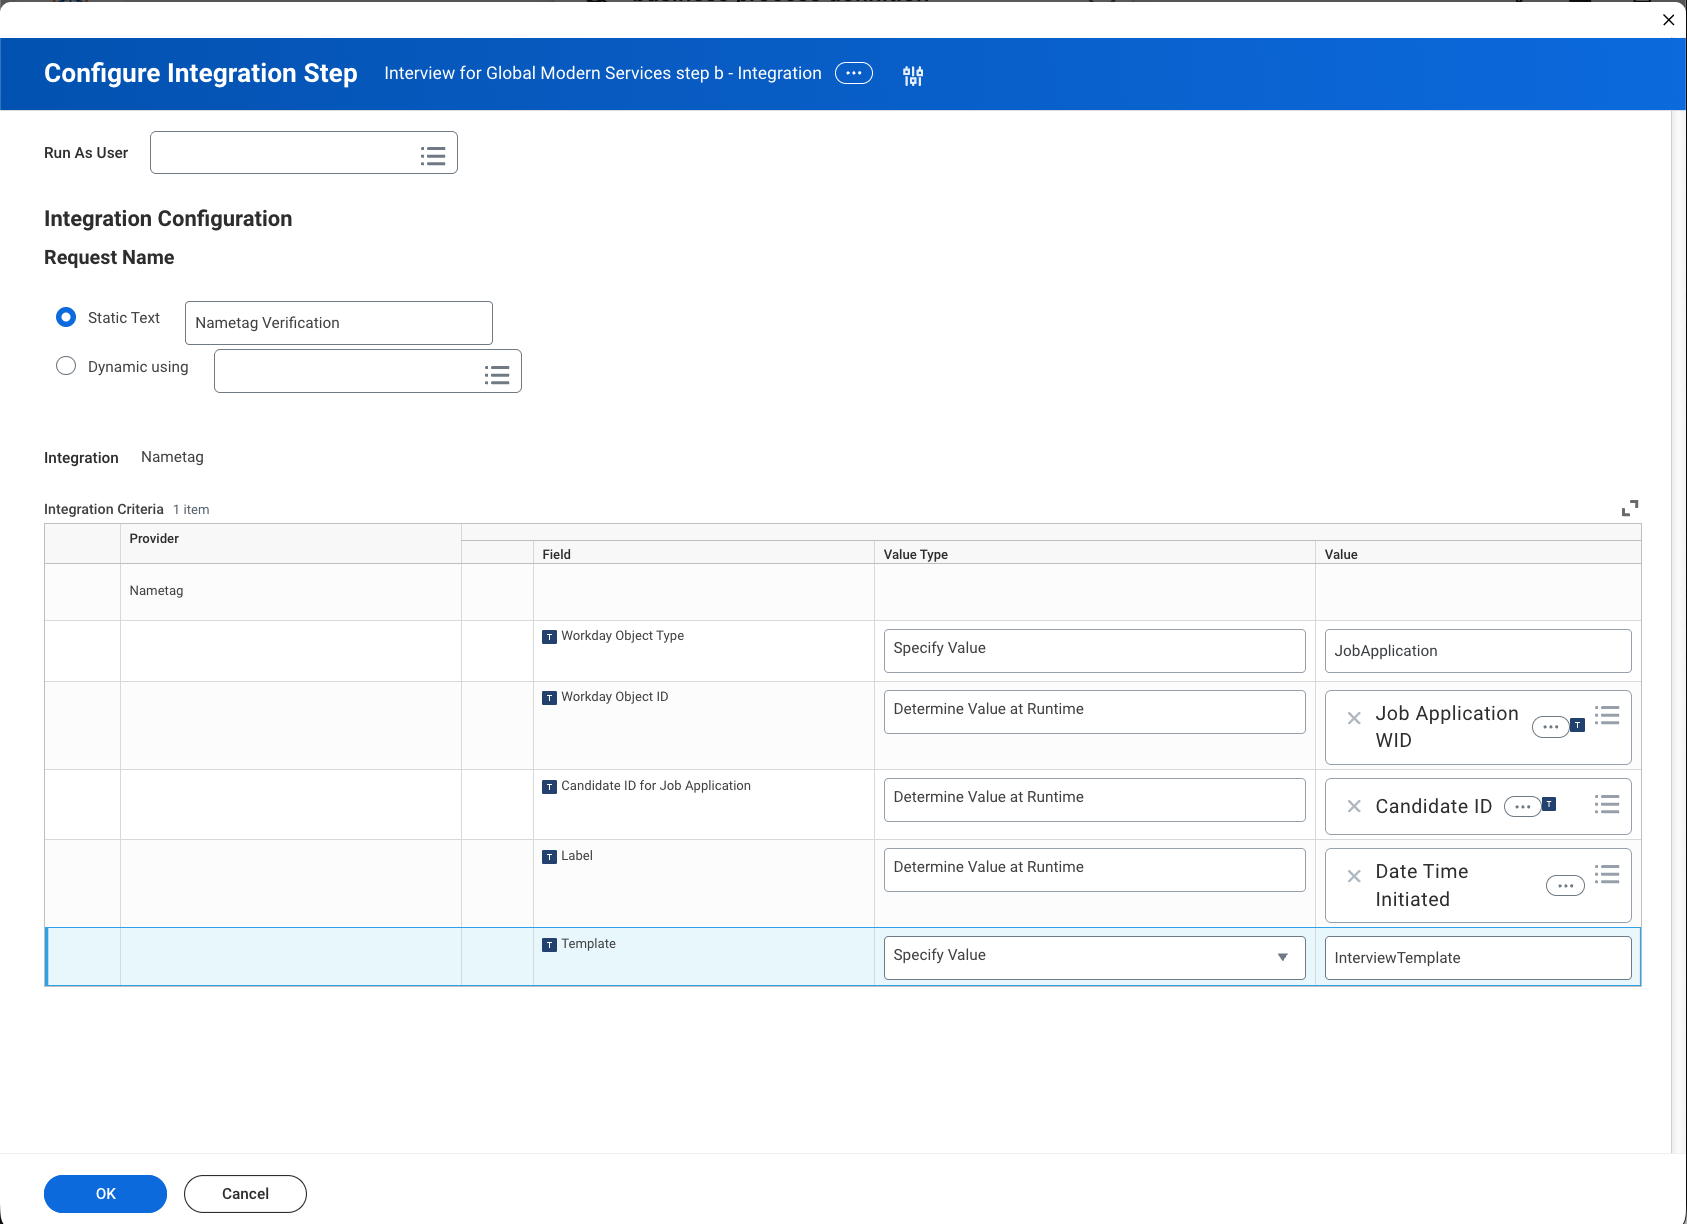
After you’ve added the Nametag Integration as an Integration Step in your target Business Process, you must configure the integration step:
| Parameter | Required | Description |
|---|---|---|
| Workday Object Type | Yes | The Provided Business Object with Custom Business Objects configured for Nametag verification operations. Must be one of JobApplication, PreHire, or Worker. |
| Workday Object ID | Yes | The Workday Object ID (“WID”) of the target Job Application, Pre-Hire, or Worker |
| Candidate ID for Job Application | Conditionally | If Workday Object Type is JobApplication, this parameter must be provided; this parameter is ignored in all other cases. This is the ID (of the form Candidate_ID=CAND-...) of the Candidate related to the Job Application. |
| Template | No | If provided, Nametag will use this template to customize the verification experience. If not provided, Nametag will use the default template for your Nametag environment. |
| Label | No | Free text you may populate to help you track requests. |
When the Nametag Integration is fired, it generates a link to be sent to the target individual to perform an identity verification. You may deliver that link via email from Workday.
The Nametag Integration sets a Custom Object field on the target object (Job Application, Pre-Hire, or Worker) with the verification link generated when the integration fired. To use this link to generate an email:
- Create a Calculated Field to expose the link as an available field in the Business Process Notification.
- If the Business Process sending the email is different from the one that triggered the Nametag Integration, create a Lookup Related Value calculated field to surface the verification link on the target Business Object. Workday Business Processes operate on separate Business Objects and do not automatically share data.
- Create a Security Group with access to the relevant email fields. Do not add any members to this group. Remember: when creating Business Process Notifications, emails are sent not only to the configured Recipient but also to all members of the configured Group.
- Create an on-exit Notification event in the Business Process for the exit of the Nametag Integration step.
- In the Notification, set:
- The Recipient to the relevant individual (Candidate for Job Application, Pre-Hire, or Worker)
- The Group to the Security Group created earlier.
- You may use the verification link exposed via the Calculated Field to generate the text of the custom email.
Recommended email templates
The following templates are recommended for delivering the verification link to the target individual.
Replace {{VARIABLE}} placeholders with the appropriate values for your organization.
Application / candidate email
Subject: Complete your identity verification for your application
Body:
Hi {{CANDIDATE_FIRST_NAME}},
As part of our hiring process at {{COMPANY_NAME}}, we ask candidates to complete a secure identity verification. The verification is powered by Nametag and typically takes less than a minute to complete.
This helps us confirm that applicants are who they claim to be, protecting both candidates and our organization throughout the interview process.
You’ll be prompted for a government-issued photo ID and a live selfie to confirm your identity.
To begin, use the secure link below:
{{VERIFICATION_LINK}}
If you have any questions or run into issues, feel free to reach out to our recruiting team.
Thank you, {{COMPANY_NAME}} Recruiting Team
New hiring email
Subject: New employee identity verification task
Body:
Hi {{NEW_HIRE_FIRST_NAME}},
As part of onboarding at {{COMPANY_NAME}}, we ask new employees to complete a secure identity verification. The verification is powered by Nametag and typically takes less than a minute to complete.
This helps us confirm your identity and ensures a secure and compliant onboarding process.
You’ll be prompted for a government-issued photo ID and a live selfie to confirm your identity.
To begin, use the secure link below:
{{VERIFICATION_LINK}}
If you have any questions or run into issues, feel free to reach out to our team.
Thank you, {{COMPANY_NAME}} Team
Existing employee email
Subject: Complete your employee identity verification
Body:
Hi {{CANDIDATE_FIRST_NAME}},
As part of {{COMPANY_NAME}}’s ongoing security measures, we have implemented a process to complete secure identity verification for existing employees. This process is powered by Nametag and typically takes less than a minute to complete.
This helps us confirm your identity and maintain a secure environment for all employees.
You’ll be prompted for a government-issued photo ID and a live selfie to confirm your identity.
To begin, use the secure link below:
{{VERIFICATION_LINK}}
If you have any questions or run into issues, reach out to our team.
Thank you, {{COMPANY_NAME}} Team
Troubleshooting
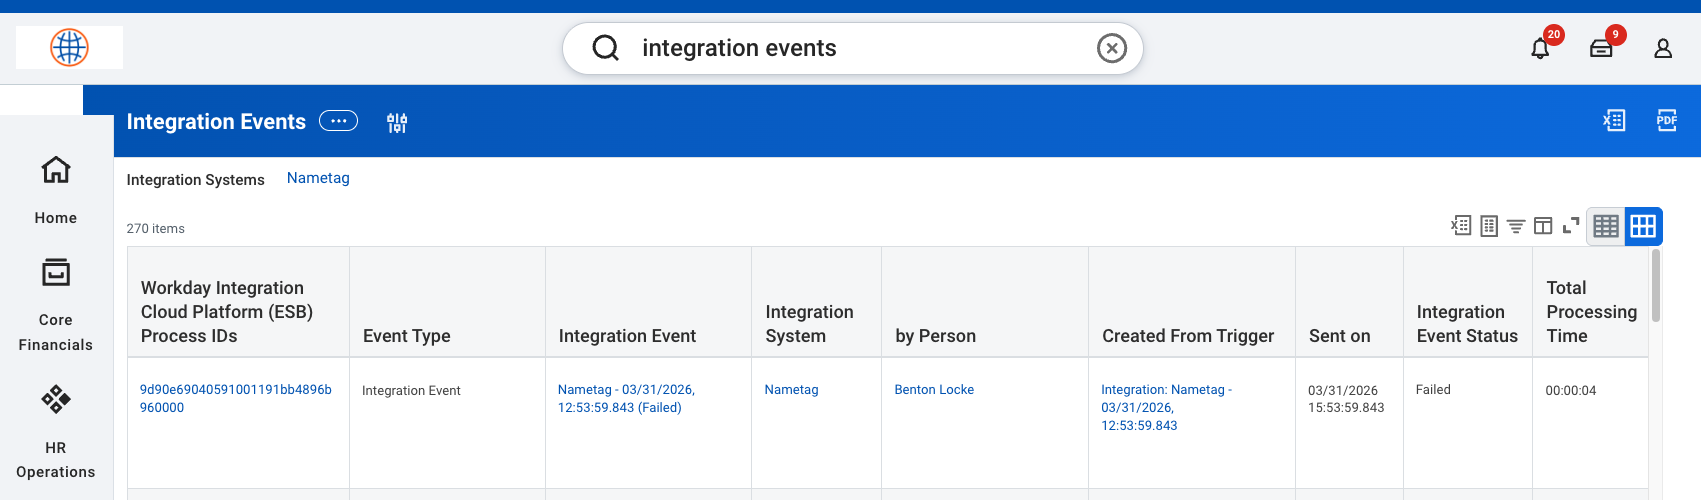
Integration Events
To see potential issues with the Nametag integration in Workday, run the Integration Events Report for the Nametag Integration System.
In the example below, you see the Integration returned an HTTP status 502 (Bad Gateway). With this information, you could conclude the Nametag server was down at the time of the request or that you have the wrong Nametag Endpoint configured for the Integration System Attribute. Other similar issues can be diagnosed in this view.
Nametag Console
All verification requests generated by Workday for Nametag are visible in the Nametag Console.
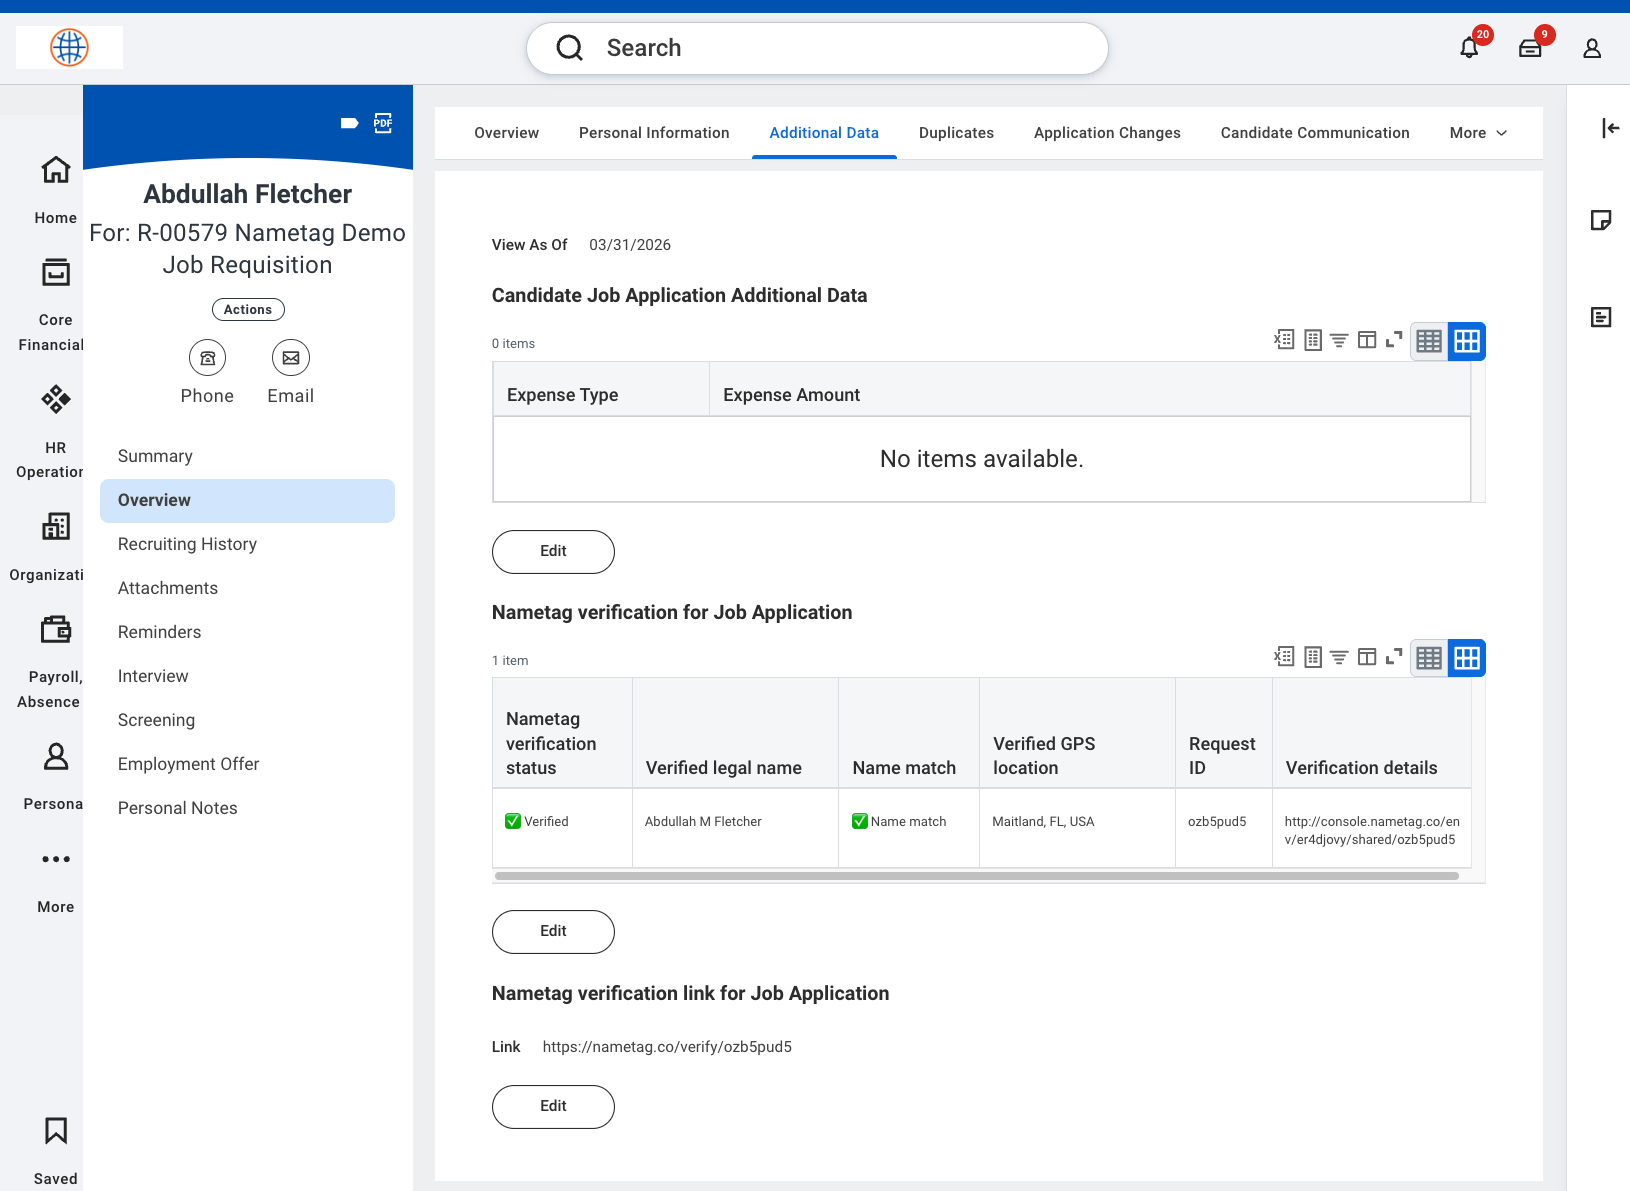
Locate the Request ID of a given request in Workday by looking at the Additional Data of the relevant Job Application, Pre-Hire, or Worker. Record the Request ID.
Then, search for that Request ID in the Nametag Console.