Using Nametag in Tines Stories
Integrate validated identities into Tines workflows using the Nametag API
Introduction
Tines is a security and workflow automation platform that uses a straightforward graphical design process to automate tasks.
Nametag is a modern identity platform that uses government-issued photo IDs to identify a person over the Internet, while preserving the privacy of the person.
Tines’ ability to work with APIs combined with the Nametag API is the simplest way to add secure identity verification to your workflows.
This article assumes you have some familiarity with Tines and no familiarity with Nametag. For a nice introduction to Tines see the content in the Tines University.
Collecting information from Nametag
You will need three things from Nametag to configure Tines:
- an environment identifier (
*ENV_ID*) - a Nametag webhook shared secret (
*SHARED_SECRET*) - an API key (
*API_KEY*)
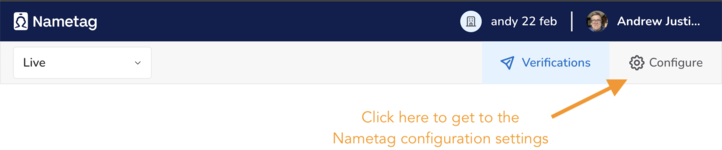
Go to the Nametag console.
Select Configure on the top right.
Select OAuth from the navigation bar on the left, and copy the Client ID. This is your *ENV_ID*.

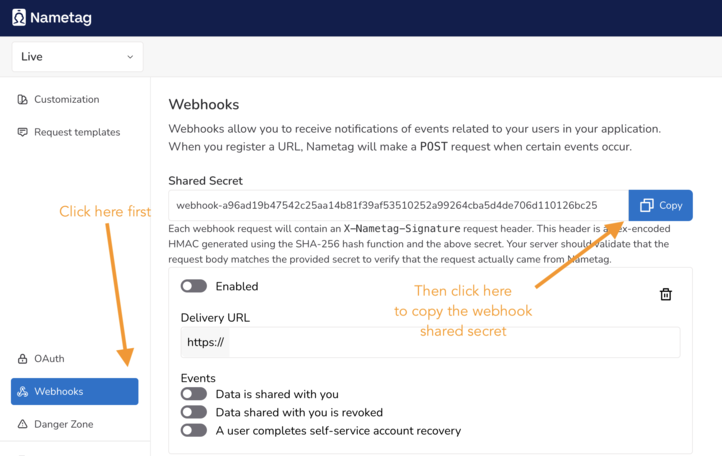
Select Webhooks from the navigation bar on the left and copy the Shared Secret. This is your *SHARED_SECRET*.
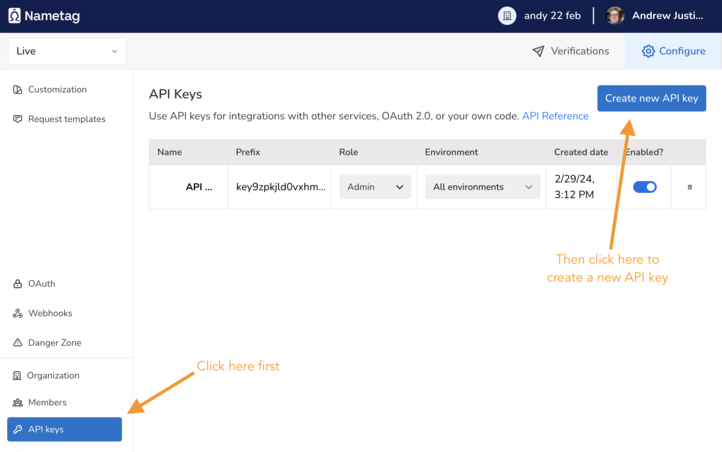
Select API Keys from the navigation bar on the left, then select Create new API key, fill in a name and copy the
API key. This is your *API_KEY*.
Adding credentials to Tines
Go to Tines.
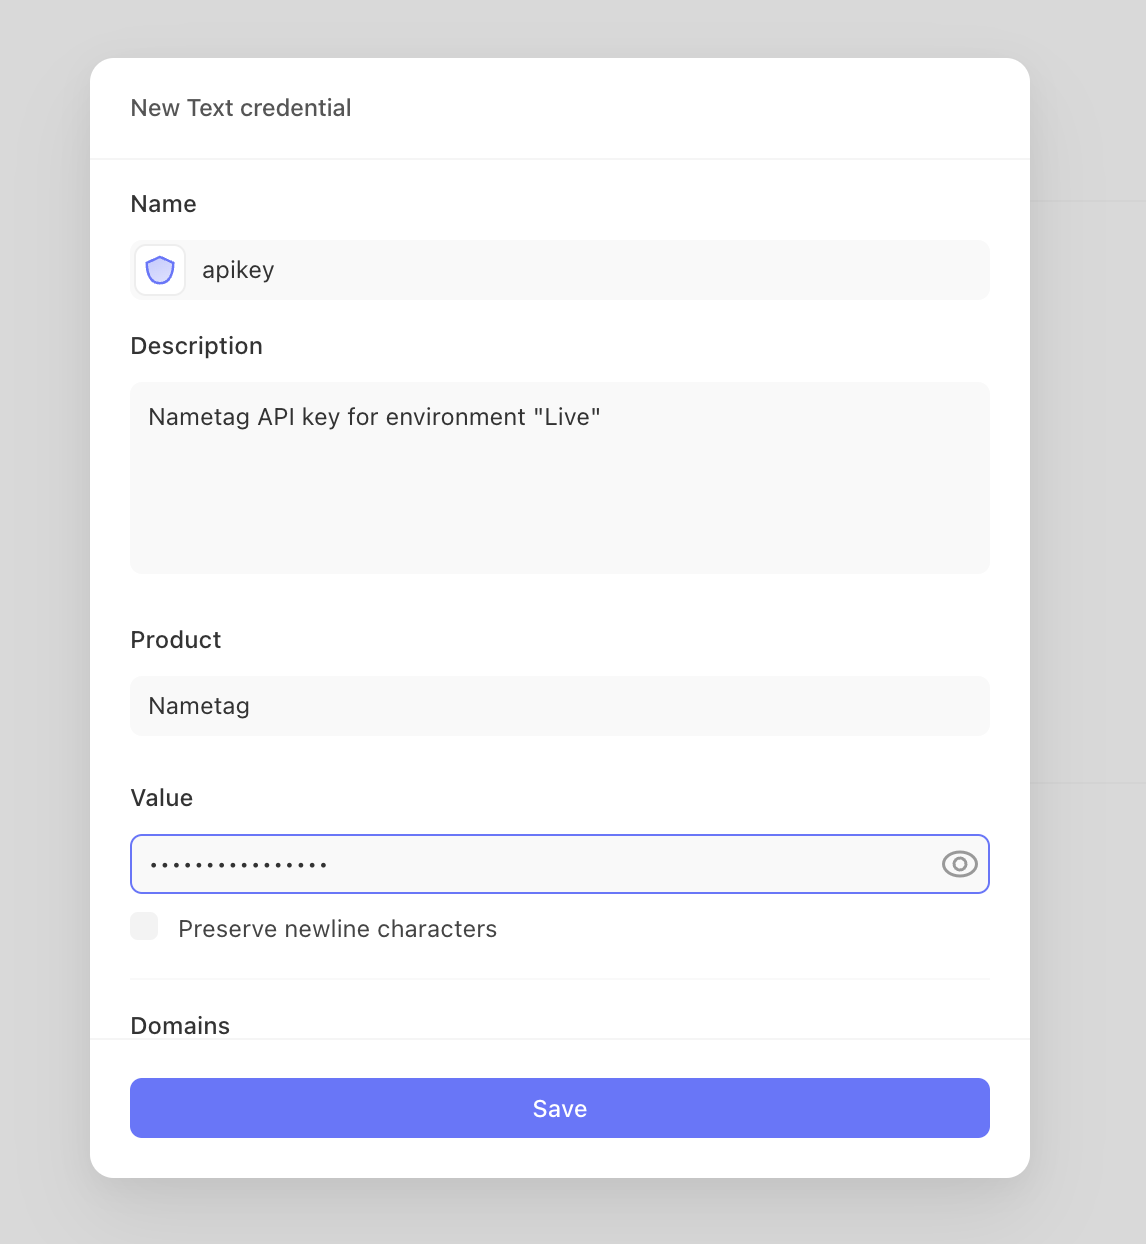
Add *ENV_ID* as a Text Credential named env_id. Leave Domains blank.
Add *SHARED_SECRET* as a Text Credential named shared_secret. Leave Domains blank.
Add *API_KEY* as a Text Credential named api_key. Add nametag.co in Domains.
Add each of *ENV_ID*, *SHARED_SECRET*, and *API_KEY* as
Credentials in Tines.
All three credentials can be entered as “Text” credentials and will look like:
Setting up Tines actions
The high-level steps that we’ll configure in Tines are:
- Fetch a Nametag request link.
- Deliver that link to the end-user.
- Wait for a webhook from Nametag.
- Fetch verified demographic information about the user from Nametag.
Fetch a Nametag request link
To get a request link that you can send to the user, make
an authenticated HTTP POST request to the Nametag API.
Drag the “HTTP Request” action into your story from the sidebar and configure it as follows:
-
Name:
RequestIDV -
URL:
https://nametag.co/api/requests -
Content type: JSON
-
Method:
POST -
Payload:
{ "env": "<<CREDENTIAL.env_id>>", "scopes": [ "nt:legal_name" ] } -
Basic auth:
- Username:
unused(the value doesn’t matter, it isn’t used) - Password:
<<CREDENTIAL.api_key>>
- Username:
Note: If you named your credentials something other than
env_idandapi_key, make sure the names match what you used.
Select Editor on the right side of the Tines workspace and verify that it shows the following.
{
  "url": "https://nametag.co/api/requests",
  "content_type": "application_json",
  "method": "post",
  "payload": {
    "env": "<<CREDENTIAL.env_id>>",
    "scopes": [
      "nt:legal_name"
    ]
  },
  "basic_auth": [
    "unused",
    "<<CREDENTIAL.api_key>>"
  ]
}
Select Play on this action. The events window shows the request to Nametag and the response, which should look like this:
{
  "request": {
    "body": {
      "id": "f78ee334-79a8-4a5e-be4a-d728e226df64",
      "status": 100,
      "env": "2zna1cddrxq9vue",
      "scopes": [
        "nt:legal_name"
      ],
      "template": "",
      "link": "https://nametag.co/x/acme/mykgjyonberdez",
      "phone": "",
      "label": ""
    },
    "headers": {},
    "status": 200
  }
}
The id, env, and link fields will be different for you. The link field contains the
URL that you’ll pass to the end-user so they can verify their identity.
Deliver the request link
Tines offers many methods to deliver data to your end-users. Any of those will work for delivering this link—you can even set a redirect to it and open it for the end-user from your Tines story.
To demonstrate the flow, use the email delivery tool.
The flow must get an email address from the user of the Tines story with a Tines web page that has a form element for entering the email address.
Create a web page by selecting the + / Tools on the left of your Tines workspace, then
drag the Page object onto your workspace. Name the page Request identity verification
and then edit the page text with instructions and add an email input field. For example:
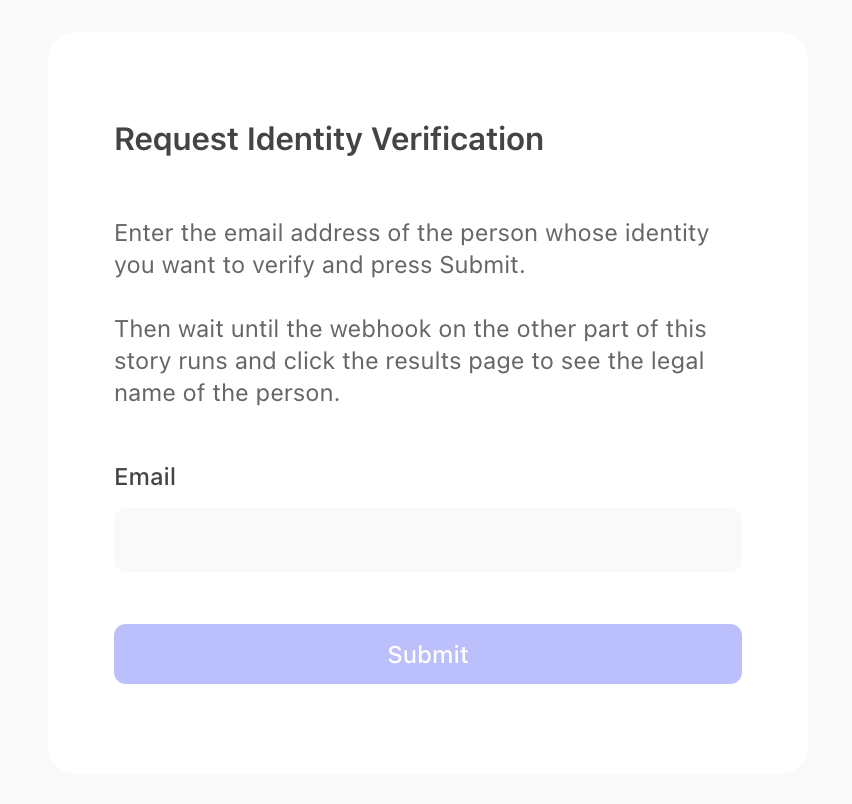
Next add a success message in the page configuration on the right of the Tines workspace, for example:
A request verification email has been sent to
<<request_identity_verification.body.email>>; please wait for them to
complete the verification, at which point the webhook action will run
and you will see the results in the page titled Results of Identity
Verification
Now that you have a form to collect an email address we can use the Tines “Send Email” action. Drag that action from the left into your workspace and configure it to send an email to the address entered in the form by setting these fields:
- Recipients: choose List and
<<request_identity_verification.body.email>>as the address. (If you named your page something other than “Request identity verification” you’ll have to make that change here, too.) - Reply to: an address end-users can reply to and ask for help
- Sender name: the friendly name that will be associated with the email
- Subject: the subject for your emails; something like
Verification from *COMPANY*. - Body: the text of the email that explains to the recipient what this is for. The link should be included somewhere in this email using the Tines variable
<<request.body.link>>
Connect the “Request identity verification” page to the “Request” action, then connect the “Request action” to the “Send email with request” action. For example:
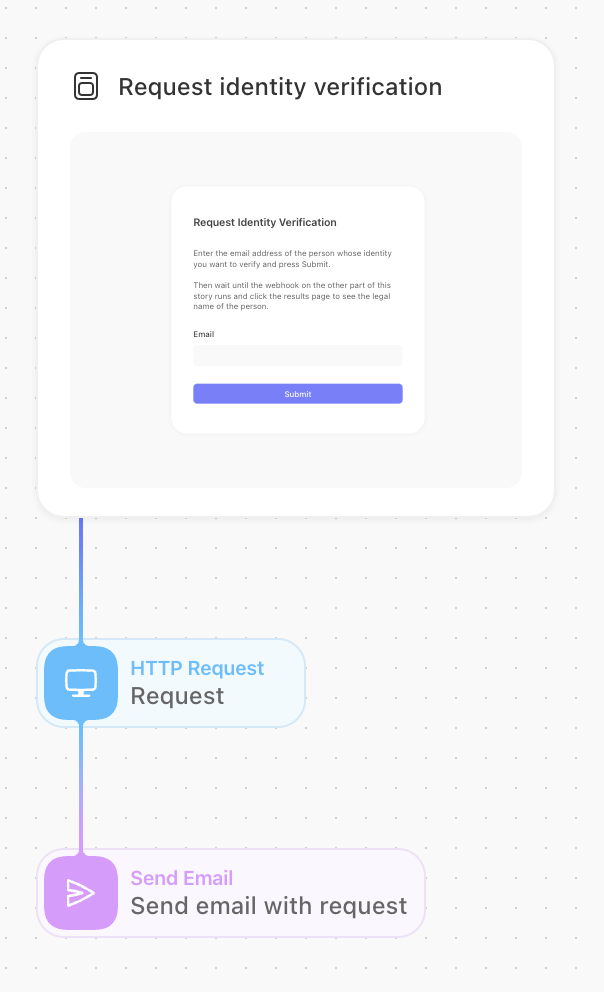
To try it, open the web page, enter your email address, then check that you got the email with the link.
Set up the Nametag webhook
Nametag can POST a cryptographically signed message to a pre-defined HTTP endpoint when an
end-user shares data with you. This is configured in both Nametag and Tines using webhooks.
Go to your Tines story and drag a Tines Webhook Action into your workspace and select
it to edit. Change the “Allowed verbs” to just post, then select copy next
to the Webhook URL. This is the *DELIVERY_URL* that you’ll enter into the
Nametag console.
Go to the Nametag console and select Configure on the top right.
Select Webhooks on the left and Add a webhook.
Paste the *DELIVERY_URL* from Tines into the Delivery URL field and press “Save”.
Select Data is shared with you from Events.
Toggle the Enabled switch to activate the webhook.
Validating the webhook in Tines
Go back to Tines and create a Trigger Action by dragging it from the left into your
story workspace. The trigger action will validate the webhook using the *SHARED_SECRET*.
Edit the rule to compare <<webhook_action.headers.x_nametag_signature>>
<<HMAC_SHA256(JSON(webhook_action.body),CREDENTIAL.shared_secret)>>
In the Editor view, the JSON for this looks like this:
{
  "rules": [
    {
      "type": "field==value",
      "value": "<<HMAC_SHA256(JSON(webhook_action.body),CREDENTIAL.shared_secret)>>",
      "path": "<<webhook_action.headers.x_nametag_signature>>"
    }
  ]
}
At this point Nametag is configured to send webhooks to Tines when someone shares data with you (via your Nametag environment) and Tines is configured to receive and validate the webhooks that Nametag sends.
Fetch the verified information
When an end-user shares data with you, Nametag will send a webhook to Tines.
The webhook body is JSON that looks like, for example:
{
  "event_type": "share",
  "subject": "*SUBJECT*",
  "request": "*REQUEST_ID*",
  "scopes": ["nt:legal_name"]
}
Where:
*REQUEST_ID*matches the value ofrequestreturned when you created the request link.*SUBJECT*uniquely identifies the person we’ve identified.
Check that *REQUEST_ID* matches the request you received when creating the
link. Use a Tines trigger action like this:
{
  "rules": [
    {
      "type": "field==value",
      "value": "<<verify_webhook_security.request>>",
      "path": "<<request.body.id>>"
    }
  ]
}
Add an HTTP Request object with the following settings:
- URL
https://nametag.co/people/<<webhook_action.body.subject>>/properties/<<JOIN(webhook_action.body.scopes, ",")>>- Content type
JSON- Method
GET- Basic Authentication
- Username:
unused(this isn’t used and can be anything) : - Password:
<<CREDENTIAL.api_key>>
The Editor view looks like, for example:
{
  "url": "https://nametag.co/people/<<webhook_action.body.subject>>/properties/<<JOIN(webhook_action.body.scopes, \",\")>>",
  "content_type": "application_json",
  "method": "get",
  "basic_auth": [
    "unused",
    "<<CREDENTIAL.api_key>>"
  ]
}
When this step runs, the response from Nametag will be, for example:
{
  "subject": "*SUBJECT*",
  "requests": [
    {
      "id": "*REQUEST_ID*",
      "created_at": "2024-03-01T21:24:37.417703Z",
      "status": 200,
      "scopes": [
        "nt:legal_name"
      ]
    }
  ],
  "properties": [
    {
      "expires": "2024-03-04T21:24:58Z",
      "scope": "nt:legal_name",
      "value": "*LEGAL_NAME*",
      "status": 200
    }
  ]
}
where *LEGAL_NAME* is the legal name of the person who shared their information with you.
Using the verified information
Now that you have the data from Nametag you can use it for many things:
Really, any place in Tines you need to have the confirmed identity of a person is a place where you integrate Nametag.
For demonstration purposes, we’ll just display the legal name on a webpage. In a real story, you might use this information in other ways. For example, you might:
- look up the person in your corporate directory and change their password using another Tines story.
- combine their legal name with other information from other Tines stories to create or update an account.
- authorize access to another Tines story based on the proof of identity that Nametag offers.
- share their legal name with a help-desk employee.
Drag another Page object from the Tools menu onto your Tines workspace and make these settings:
- Page behavior
- Show success message
- Success message
Hello <<http_request_action.body.properties[0].value>>- Submit automatically
- On
Summary
At the end of these steps, you will have a Tines story board that looks like this:
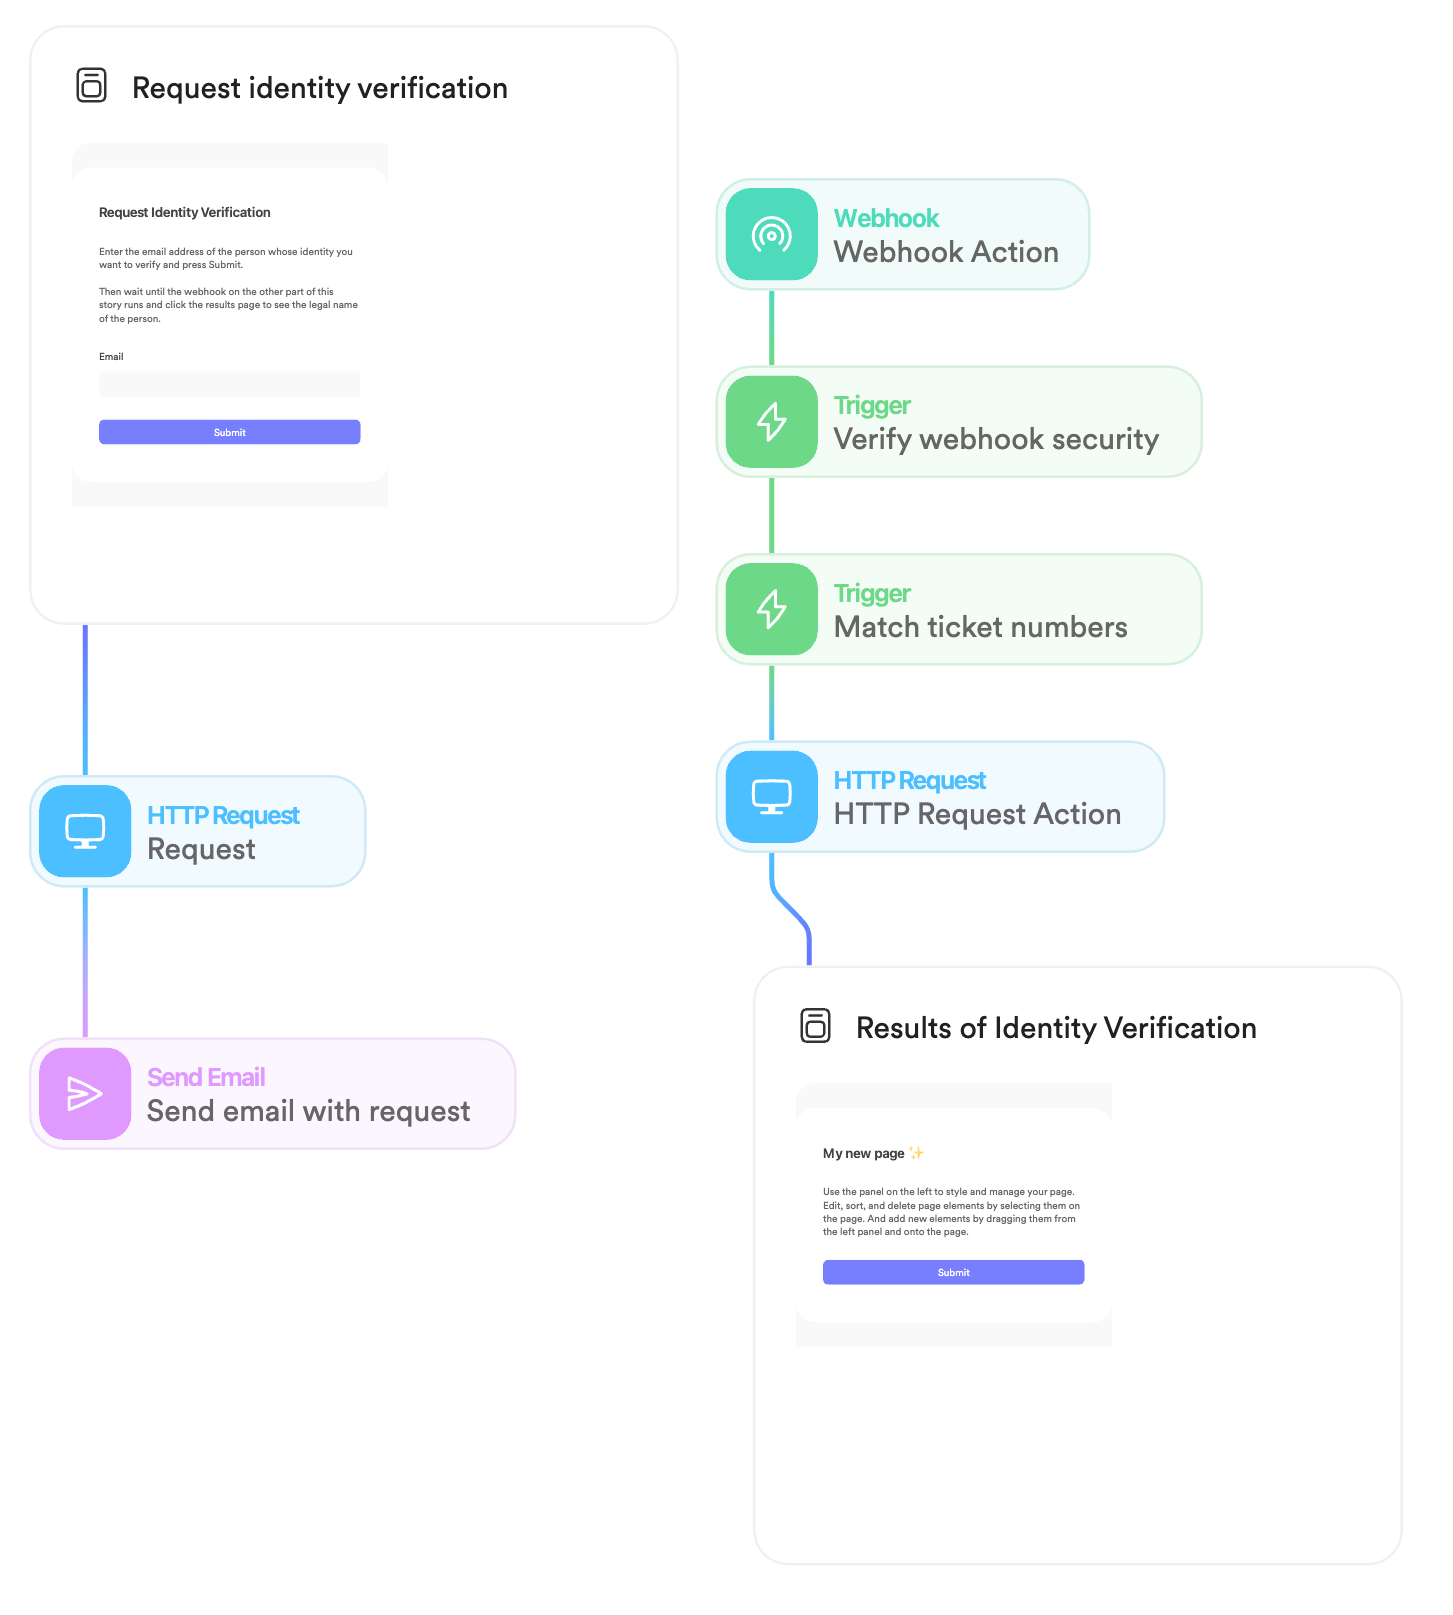
This story shows how you can use Nametag to determine the verified identity of a user.